
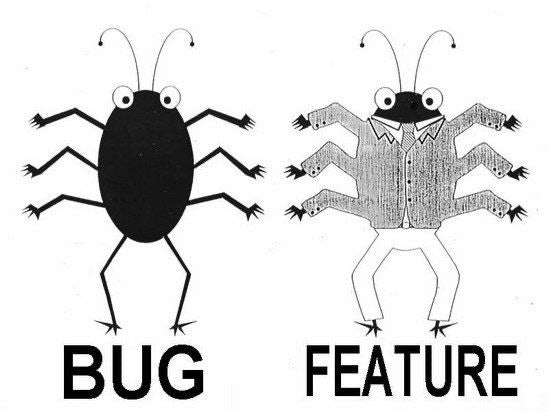
‘Bugs are everywhere’ – you think, trying to fill the water bank on your office’s coffee machine, but the situation changes since the manager continues with ‘WE HAVE A BUG IN PRODUCTION!’.
So, what will you do if your team misses some bug in production? What will you do if your manager declares the Bug Hunting as a primary goal for your team in the name of the Client? What will you do, if once you come into the office and see the new poster ‘WANTED Bug Bounty Program’ on your team dashboard?
Well, the last question seems to be off the topic, but we’ll try to answer at least the other ones about quality processes and how we can save a lot of money without hiring dozens of engineers for manual support.
The answer we suggest is – Automation, providing some coverage for your Project with Unit, API, UI Tests allows to ensure that important functionality doesn’t break after the regular code changes. Because in this way you will save the time or/and money in one or another way, that’s why we discuss how can we use pre-scripted tests on an application.

Furthermore, on this post, you will find a step-by-step instruction for implementing the Automation processes into your CI/CD and running the tests in your Azure DevOps Pipeline.
Having a little remark, I believe it’s important to say, that Setup Chapter for a Demo Project is made with the idea to create some basis on which we will add our Automated Tests, so you can use your own project instead or download already created project with the following github link:
Now we are ready to start, so let’s the battle begin!
The idea for this chapter is to create a Demo Project for the further needs, as the last warning - if you have your own project, you can continue with the Chapter II, implementing the testing coverage. Otherwise, welcome to the Chapter instructions:
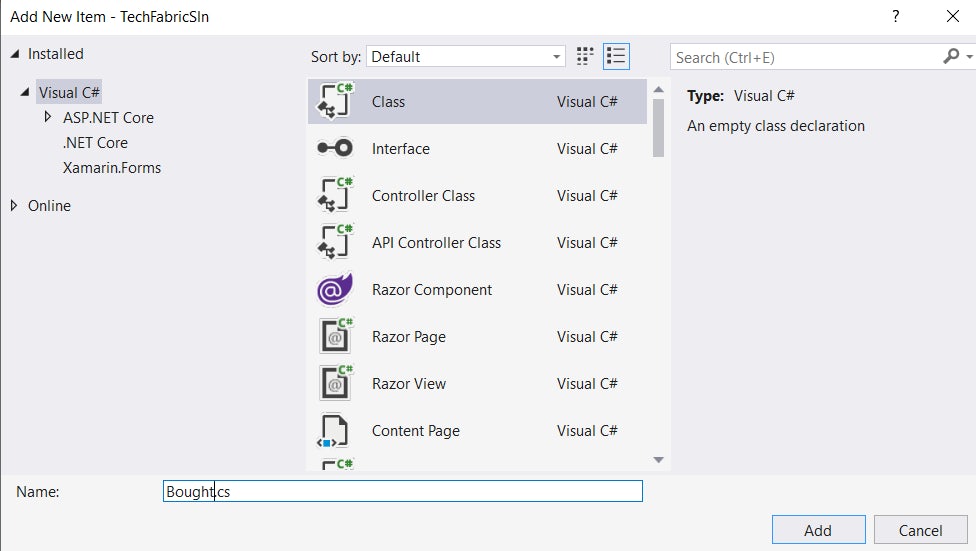
1. Open your console or terminal;
2. Create a folder for your solution:
mkdir TechFabricSln3. Create folders for Main and Test Projects
mkdir src
mkdir test
4. Create a Project in the ‘src’ folder & build the Project
cd src
dotnet new webapp -n TechFabricSln
cd TechFabricSln
dotnet build
5. Create a Test Project in the ‘test’ folder & build the Project
cd..
cd..
cd test
dotnet new nunit -n TechFabricSln.Test
cd TechFabr*
dotnet build
6. Create solution for your projects:
dotnet new sln --name TechFabricSln7. Add your Projects to solution:
dotnet sln TechFabricSln.sln add src/TechFabricSln/TechFabricSln.csproj test/TechFabricSln.Test/TechFabricSln.Test.csproj8. Add a reference for Test Project:
dotnet add test/TechFabricSln.Test/TechFabricSln.Test.csproj reference src/TechFabricSln/TechFabricSln.csprojAt the end, you will have some structure like this:
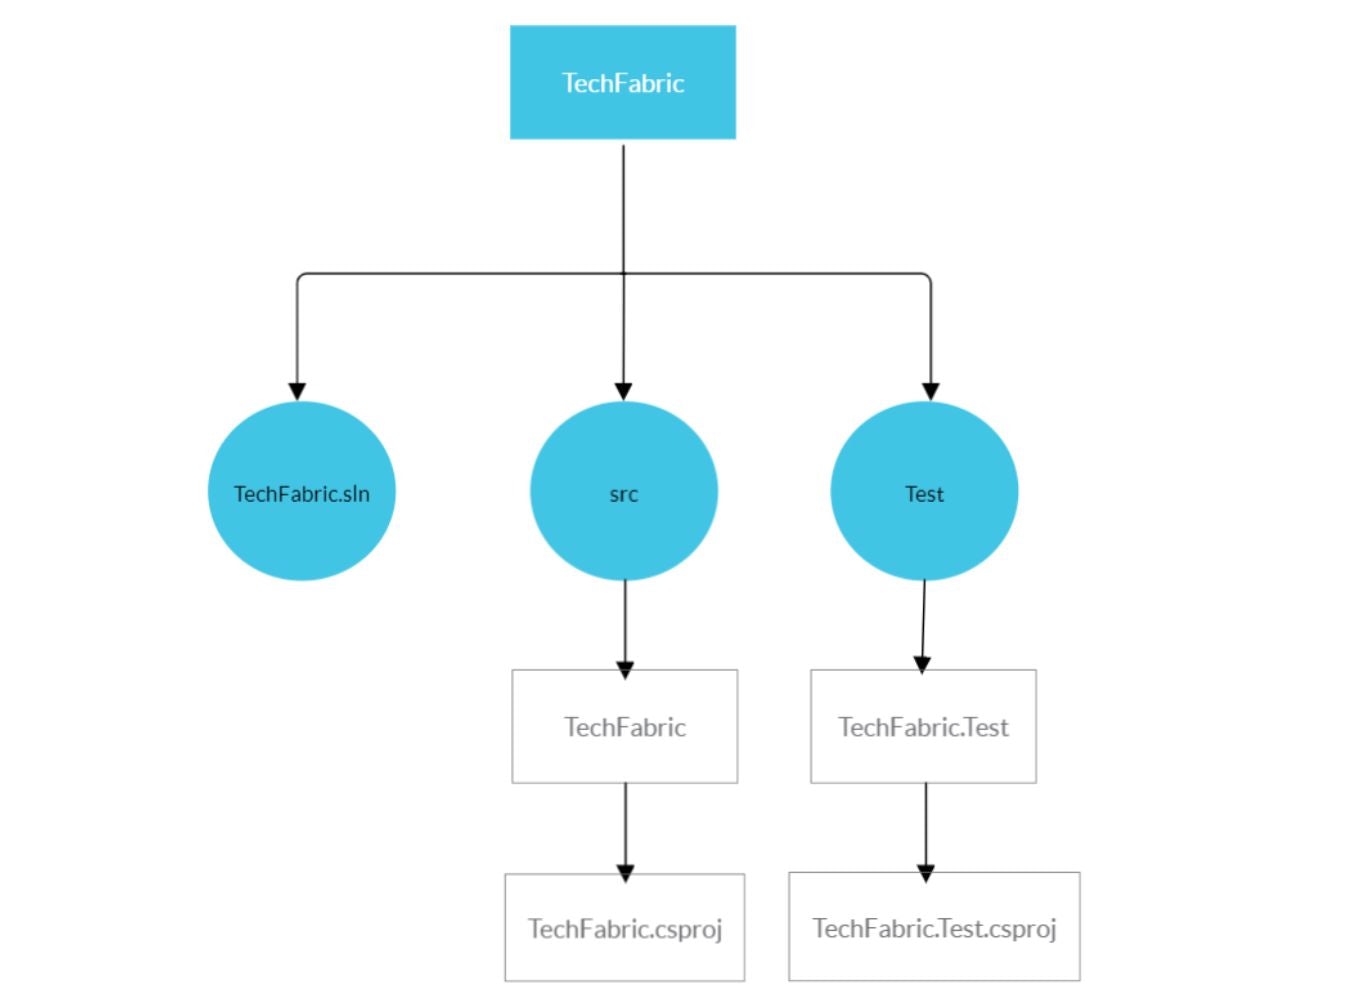
The only difference is the name of the Project, the diagram shows you the example of how it can be used. To make an analogue for your project – replace the ‘TechFabric’ as proposed in graph or ‘TechFabricSln’ as in the example with your Project’s name.
So now, lets add a simple function to our project, which we can cover and test with our unit-tests:
1. Add an additional class for the Main ‘TechFabricSln’ Project, in our example we will add ‘Bought’ class:
2. Write some functions which you want to test. The following code defines a new bool variable which verifies who bought something in our shop.
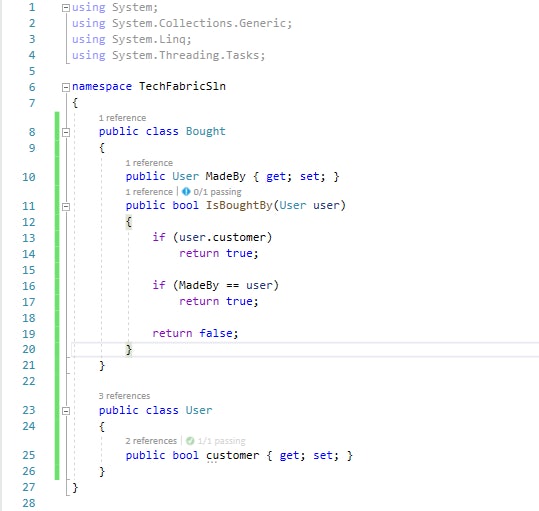
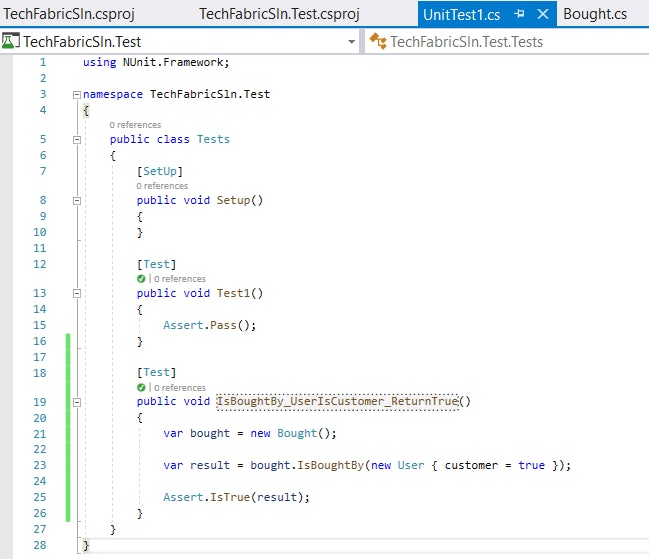
3. Now, let's create a quick check for declared variable. To do this, create an additional [Test] in our Test Project, and write down the code which verifies something you would like to test. In the example we verify ‘Bought’ class with a ‘isBoughtBy’ method:
As a final step, all that you need to setup is to create a GIT repository, and push your code. Be a team member and track yor changes in source control tool, but not on your local machine!
Well, the instructions are done, so now is the time to run your Unit tests and verify if everything good or not.
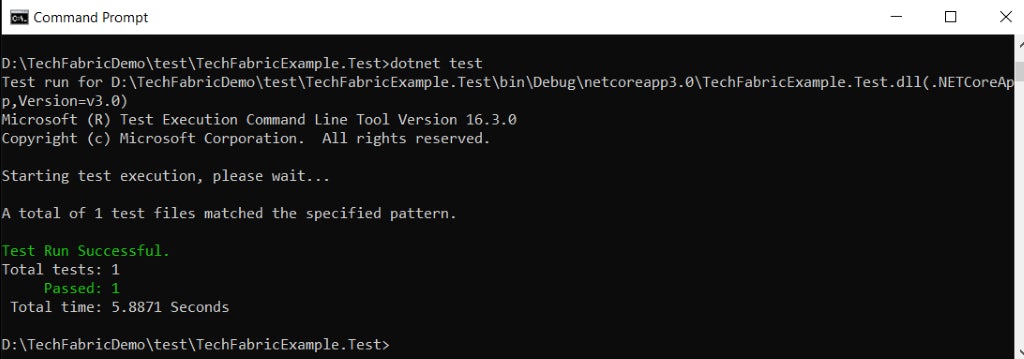
If you see the green lines, you can be pretty sure, that you made the first step in protecting your project from uninvited guests.
The following step is to go to the main parts of our topic, and create your first Azure DevOps Pipeline.
Performing an automated testing as a part of building pipeline is a good way of verifying unexpected problems before pushing the build on some Test or Customer environments.
In this chapter you will find how to create a build procedure which will include your test runs and made a good basic fundament for the further quality assurance processes.
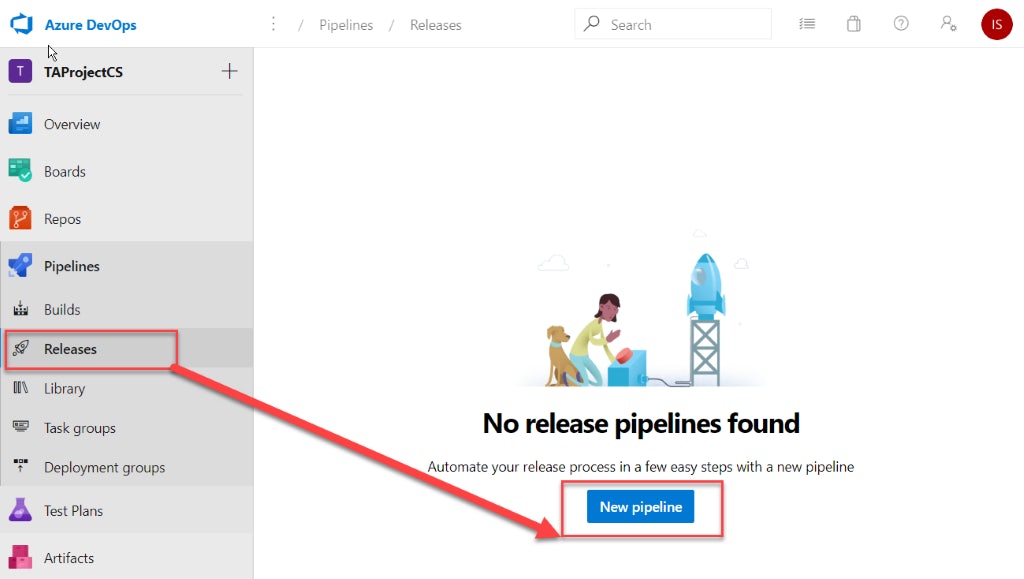
No more talks, lets start with creating your first Build pipeline:

4. Connect to your source control tool
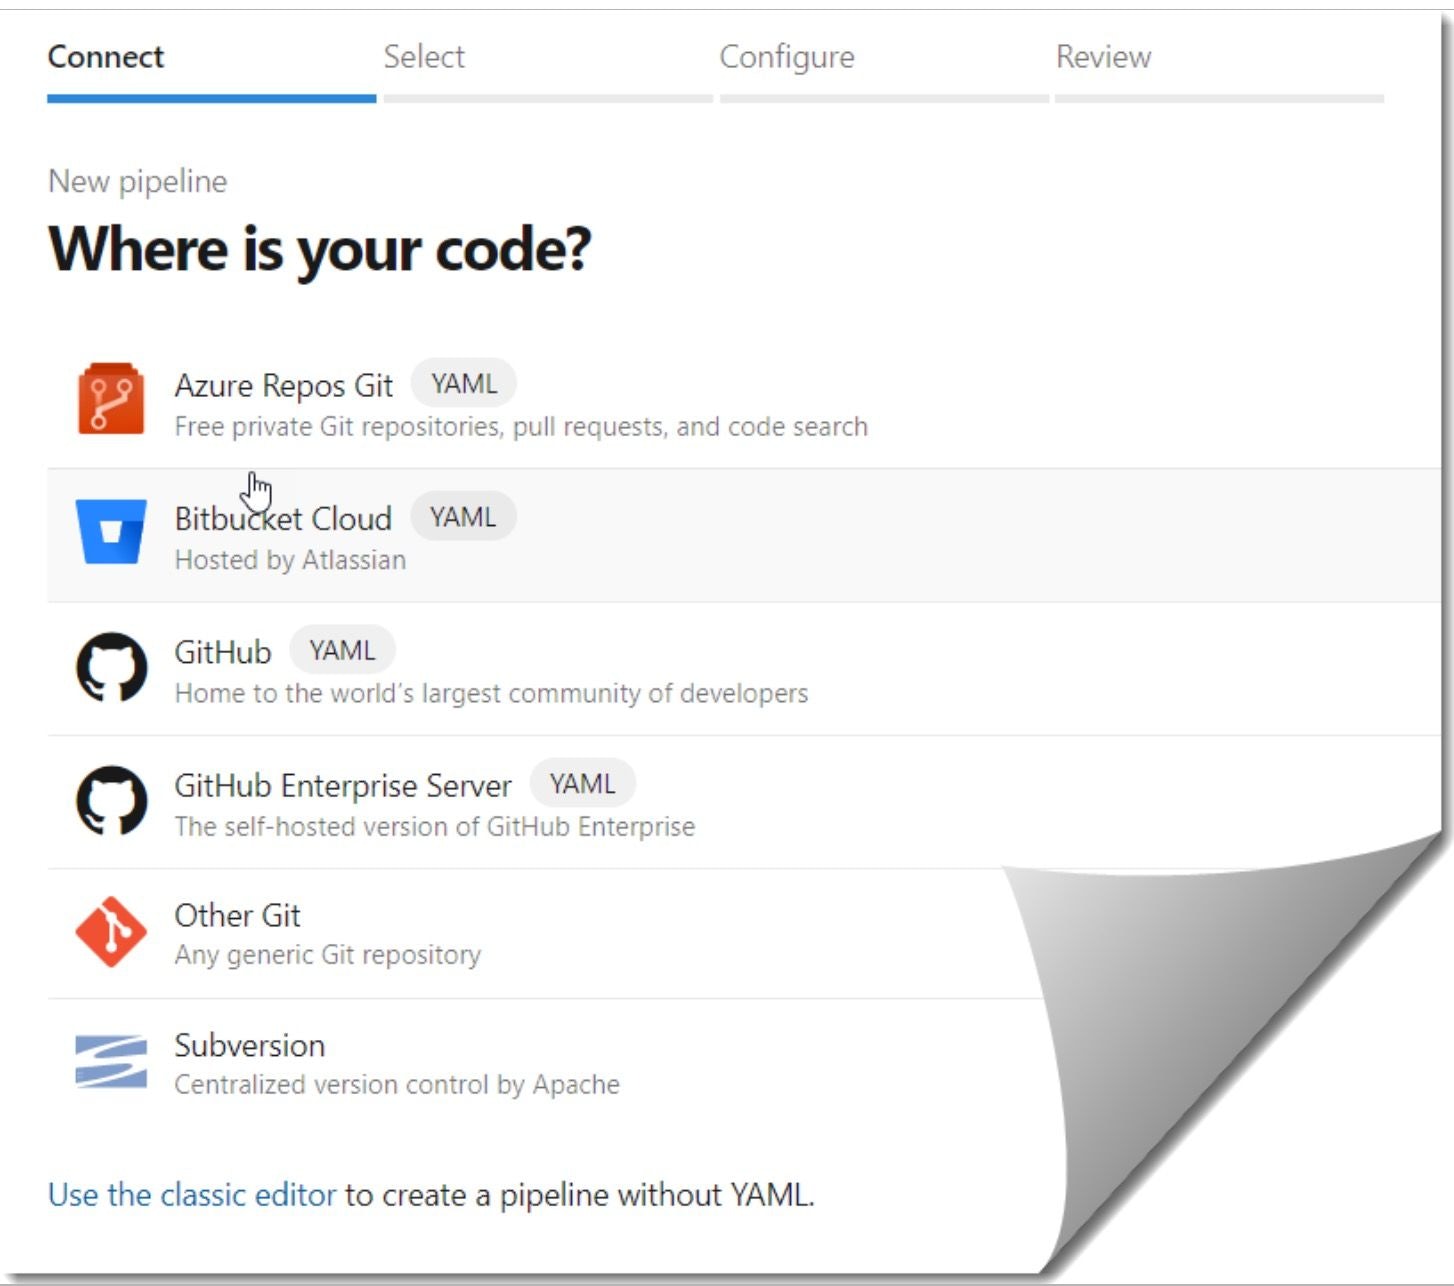
5. Select your Project’s repository

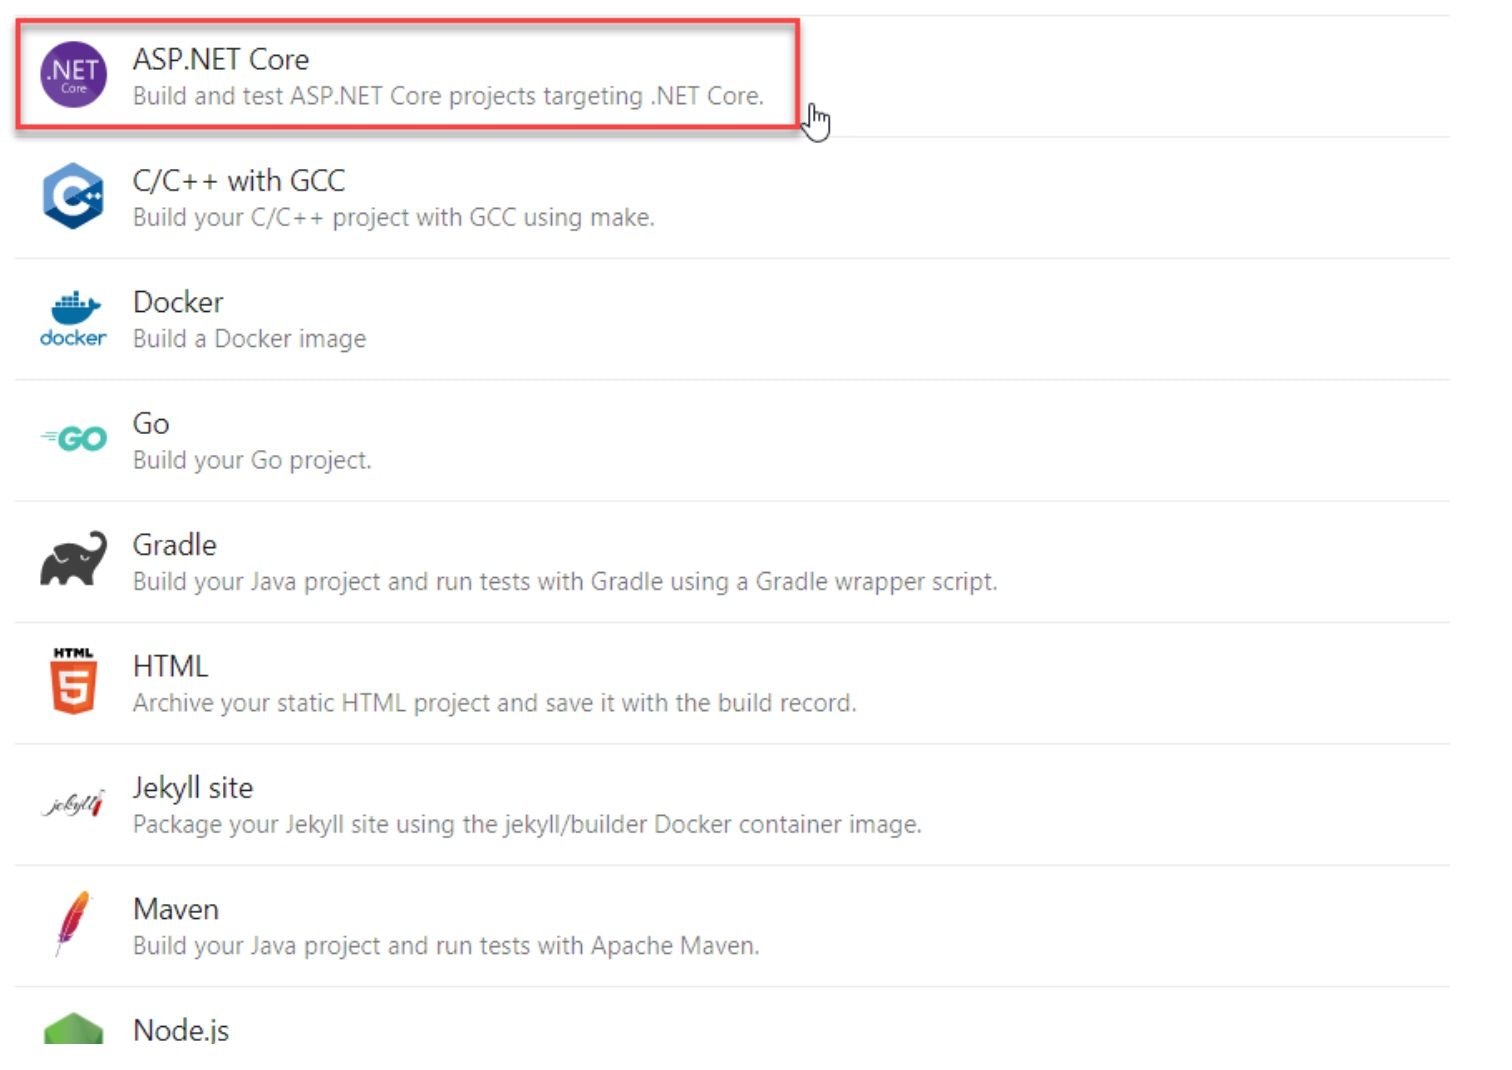
6. Select ASP.NET Core Template:
7. Add the following command to run the Tests from Test Projectinto the yml file:
- task: DotNetCoreCLI@2
  inputs:
    command: test
    projects: '**/*Test/*.csproj'
    arguments: '--configuration $(buildConfiguration)'
In fact Azure DevOps will read configuration file, and execute the steps as described.

8. Press ‘Save and Run’ button, with ‘commit directly to the master branch’.
After the build procedure is done, we can see the builds results in Logs. Especially, we are interested in our ‘DotNetCoreCLI’ command, so let’s check it.
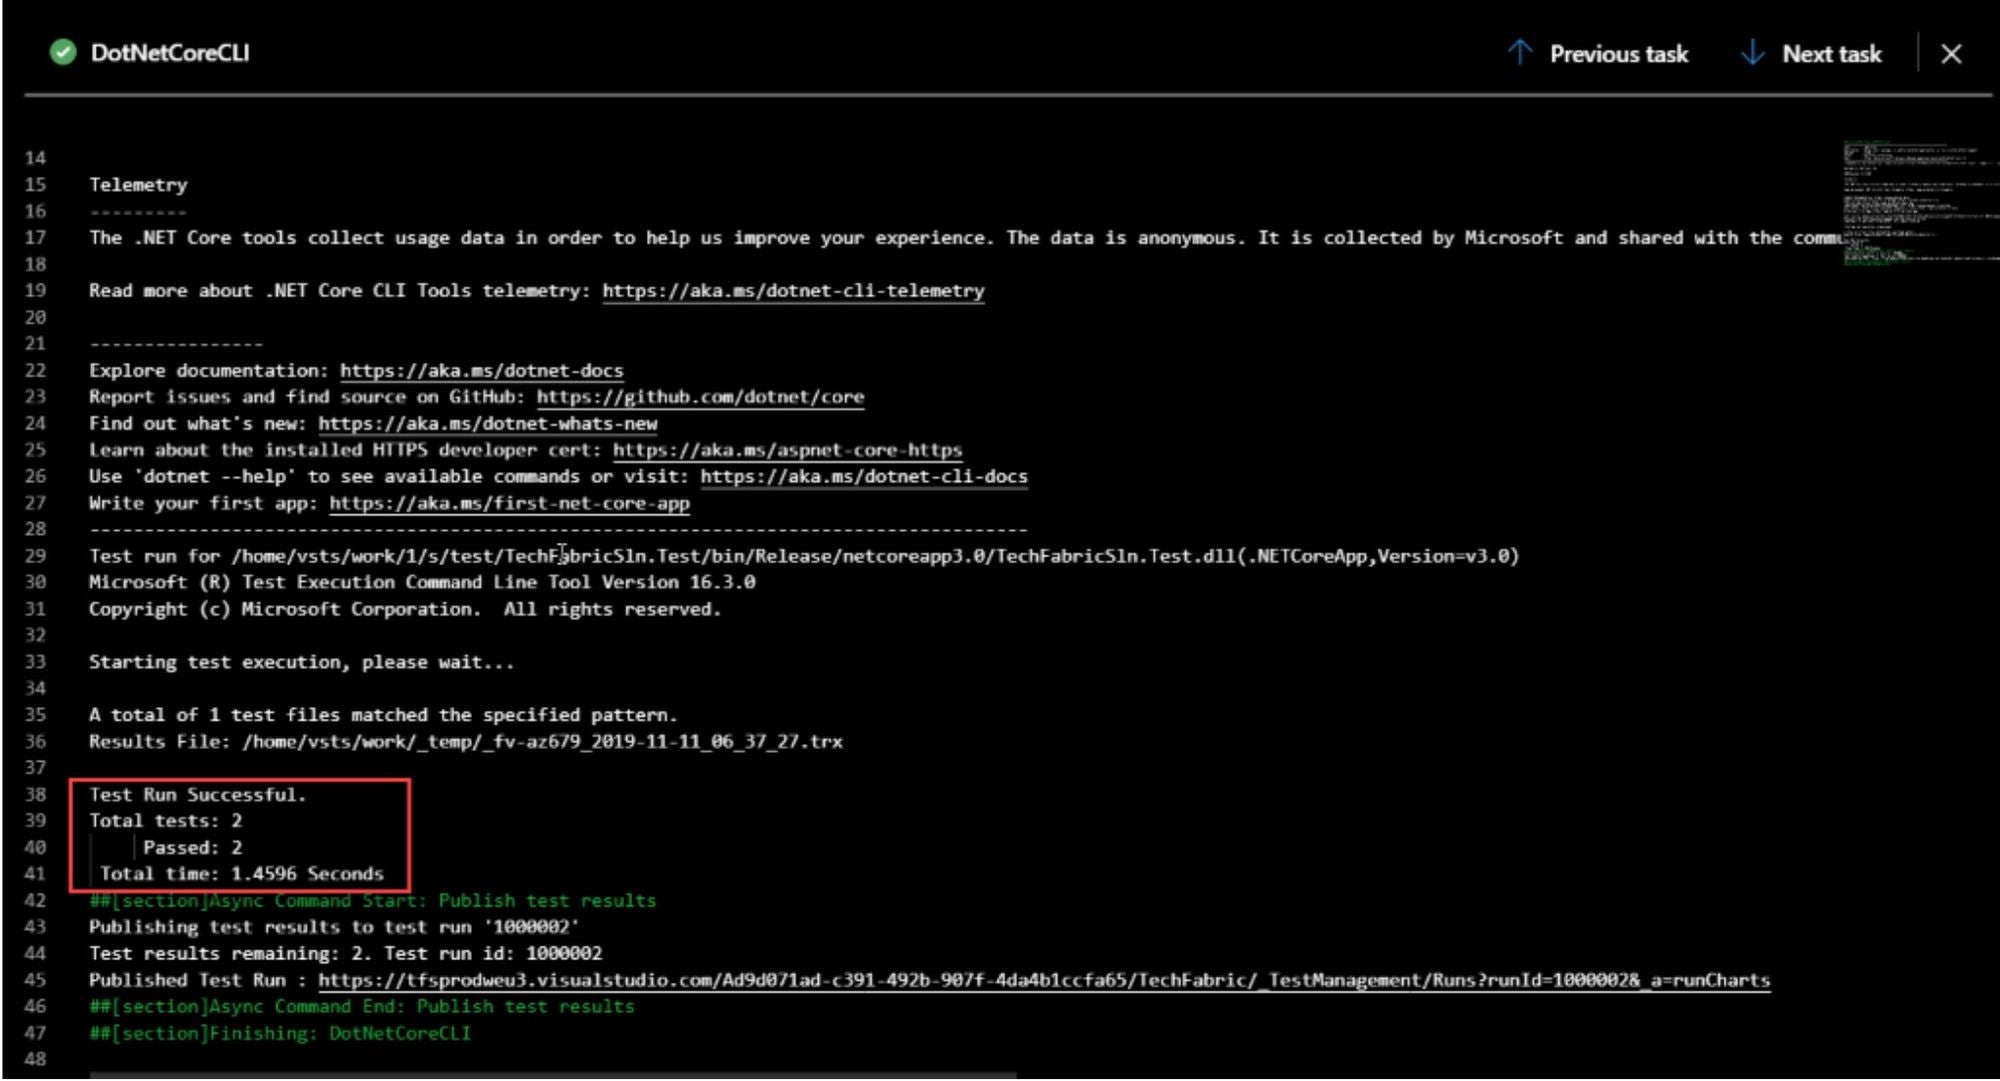
You can see, that in fact, nothing more than ‘dotnet test’ command is used in our DotNetCoreCLI task.
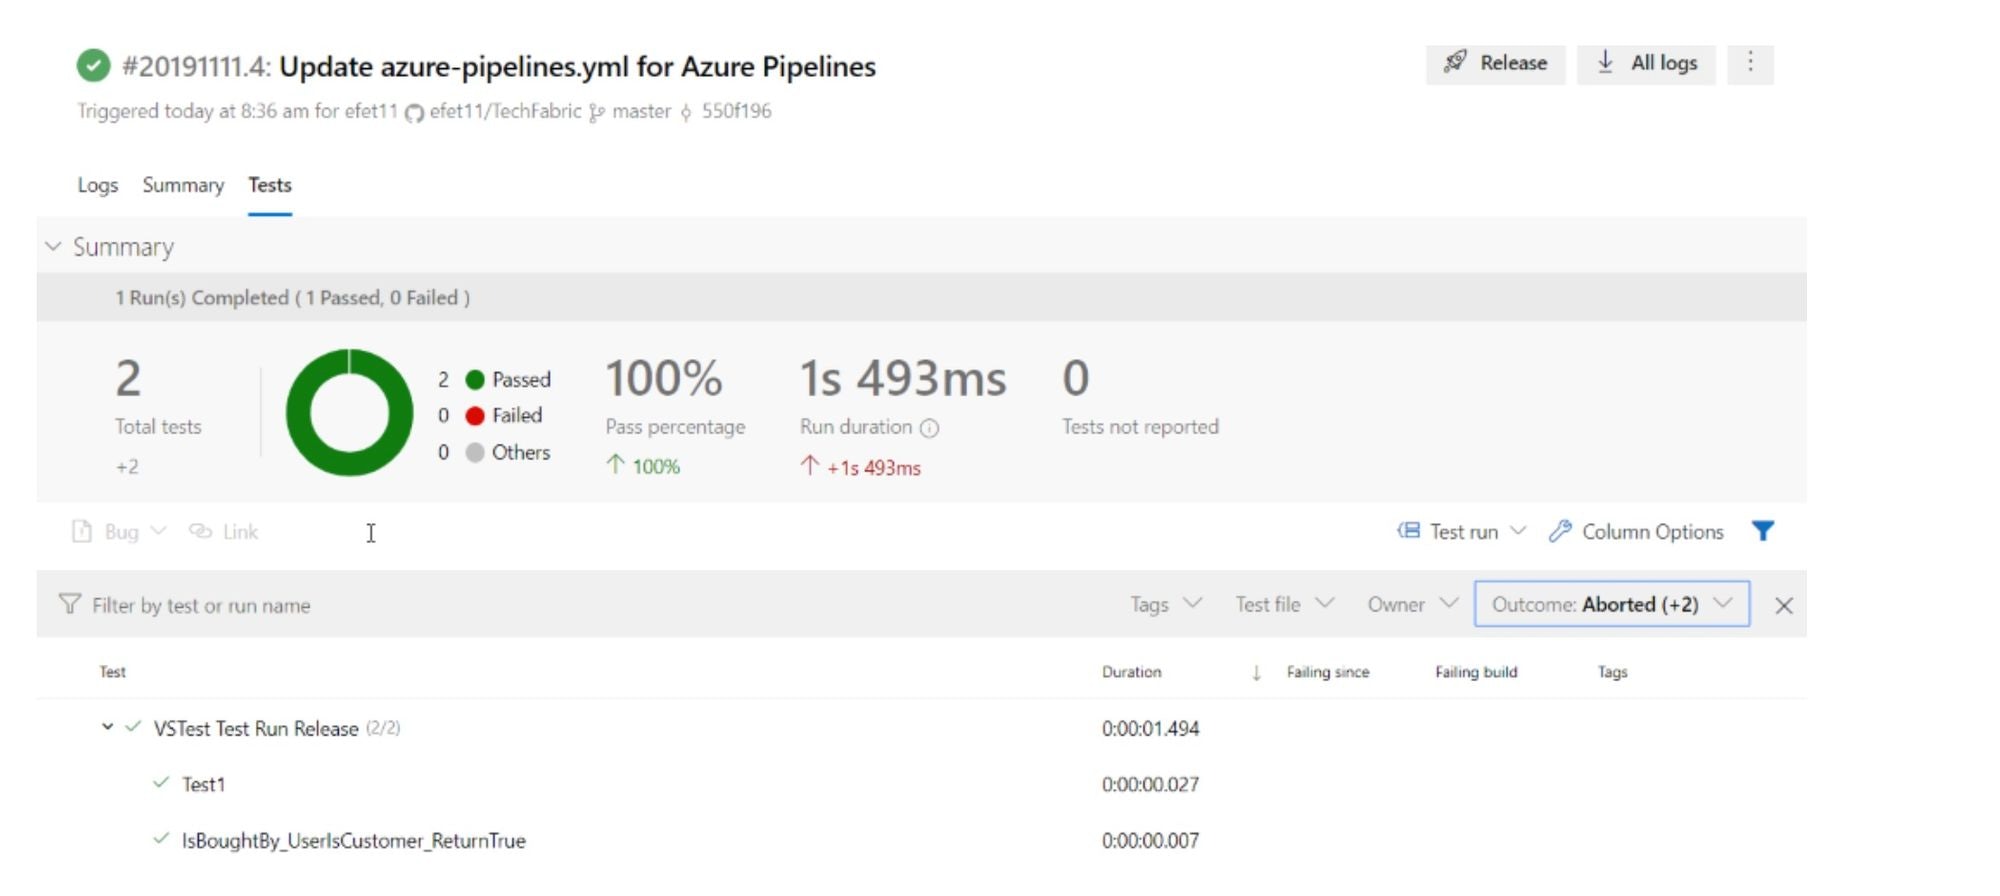
Detailed information about our Test Run for the build can be found in ‘Tests’ block of the build:
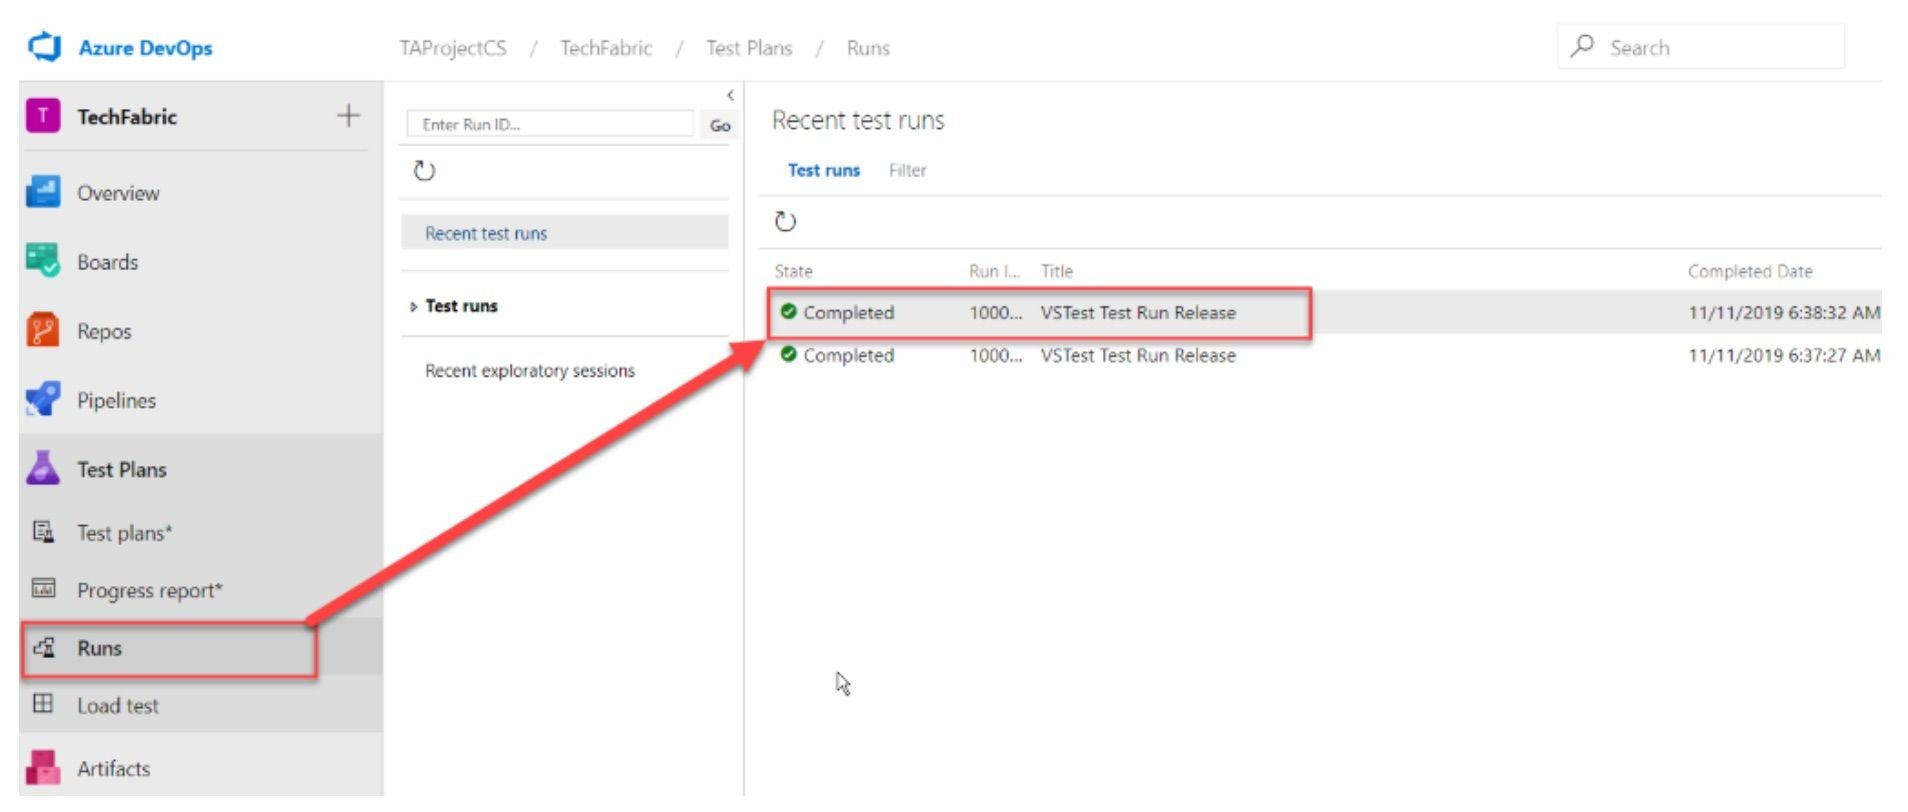
Also, you can check detailed report about all your test runs in Test Plan -> Runs
Now, your Build Pipeline contains at least one Unit test, which works every time you run the Build, and verifying if are there any unexpected changes or not.
And from this point, we can move to the next chapter, and Create Continuous Delivery Pipeline, which includes some UI Automated Tests on Selenium.
As soon as the build is done and Unit – Tests are passed on the Build Workflow, it’s a common thing for a quality control or development teams to create and support some functional (UI) tests in release workflow after the app is deployed to some test environment.

That’s why in this chapter, we will implement some UI Tests based on a Selenium framework [Selenium is an open source test framework for web applications which supports any popular browser and can be run on almost every operating system], using the UI Test framework additionally to your Unit or API tests you will be able to detect any changes also on front-end of your application.
To run Selenium Test for your own project, you need to Deploy it’s in continuous deployment (CD) release pipeline and Publish it on Azure, we won’t spend time on this in the post, and if you’re interested in - you can find the details here: Publish Web App to Azure or write us a message, and we’ll create a separate article with detailed description.
In this chapter, we will run the tests against Mircrosoft.com, and you will find how to:
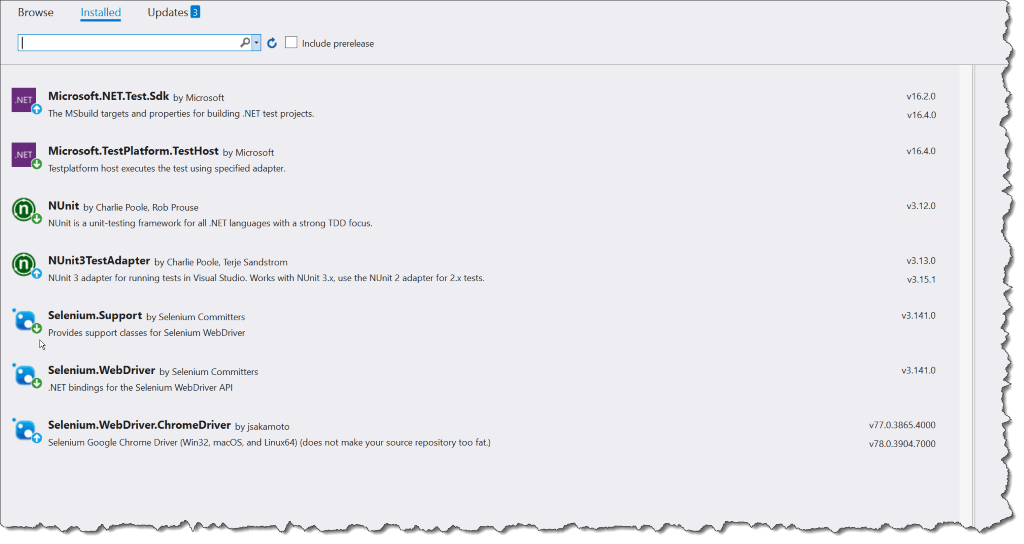
Till this moment, we already have continuous integration (CI) build pipeline with running Unit Tests, so all we need is to add Selenium References, Driver and Test for existing Project. To do this:
The list of installed packages at this moment is:
4. Add new Class for Selenium Tests ‘SeleniumTest.cs’ to the Project
5. Add Selenium Test in SeleniumTest.cs’ class.
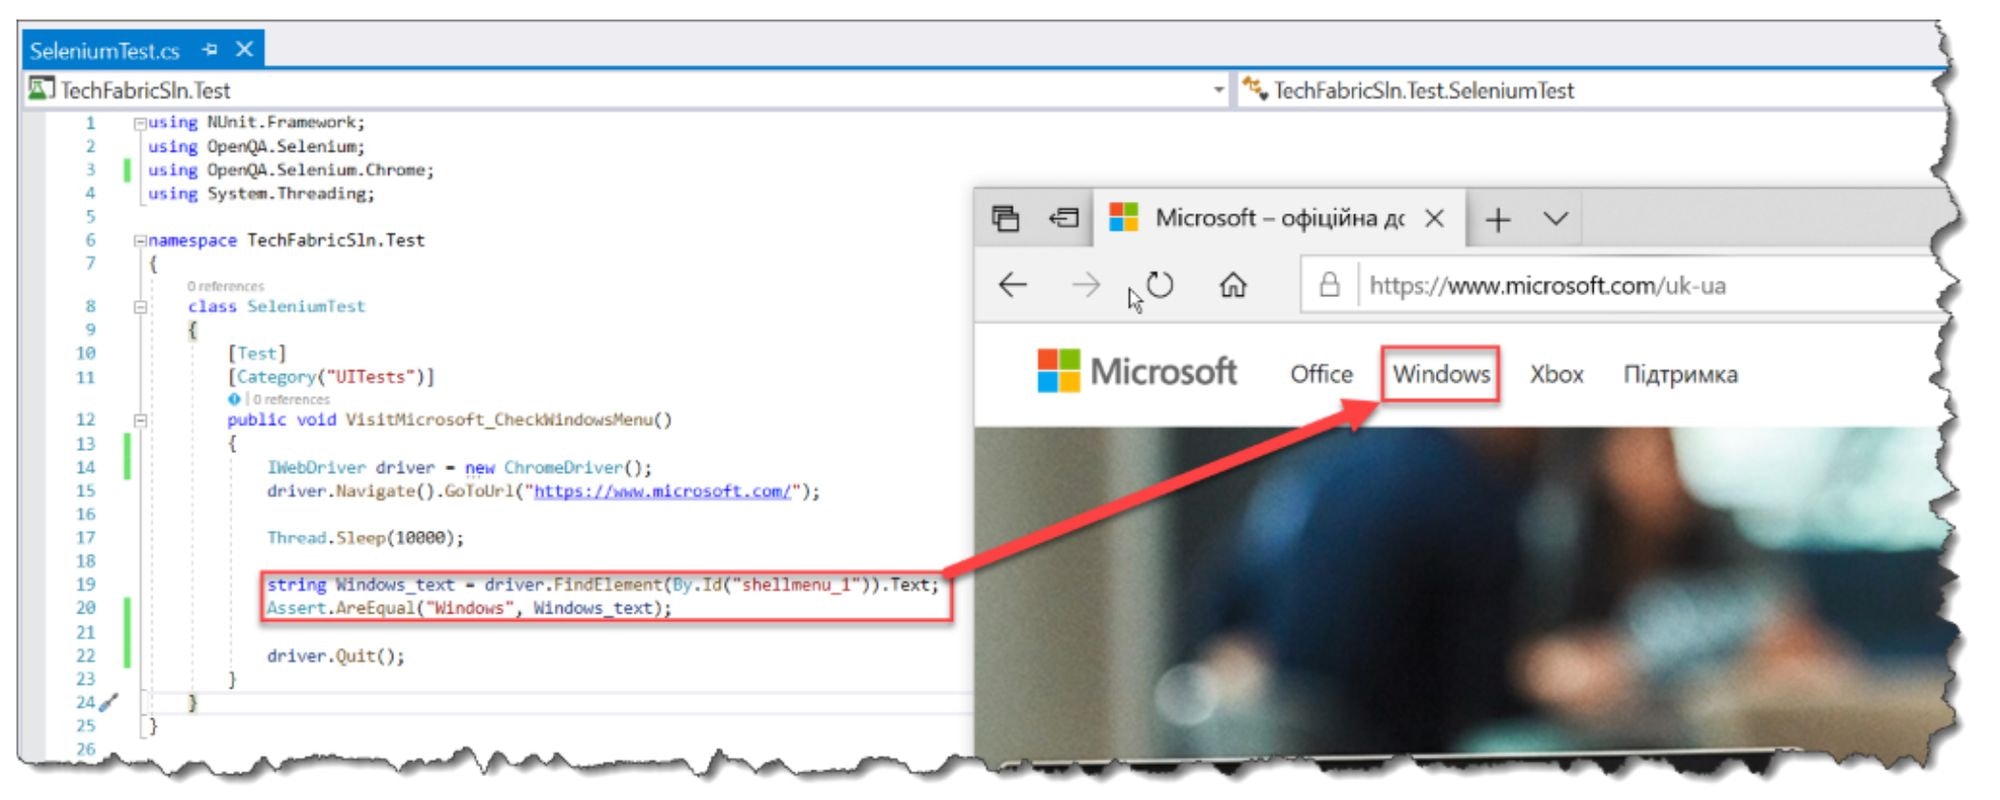
As an example, we will add the Test which finds the Microsoft Page, and verifies which page contains the ‘Windows’ menu. The code is:
using NUnit.Framework;
using OpenQA.Selenium;
using OpenQA.Selenium.Chrome;
using System.Threading;

namespace TechFabricSln.Test
{
  class SeleniumTest
  {
    [Test]
    [Category("UITests")]
    public void VisitMicrosoft_CheckWindowsMenu()
    {
      IWebDriver driver = new ChromeDriver();
      driver.Navigate().GoToUrl("https://www.microsoft.com/");
      Thread.Sleep(10000);
      string Windows_text = driver.FindElement(By.Id("shellmenu_1")).Text;
      Assert.AreEqual("Windows", Windows_text);
      driver.Quit();
    }
  }
}
6. Add Publish chromedriver for your Test Project into .csproj file:
<PropertyGroup>
  ...
  ...
  <PublishChromeDriver>true</PublishChromeDriver>
</PropertyGroup>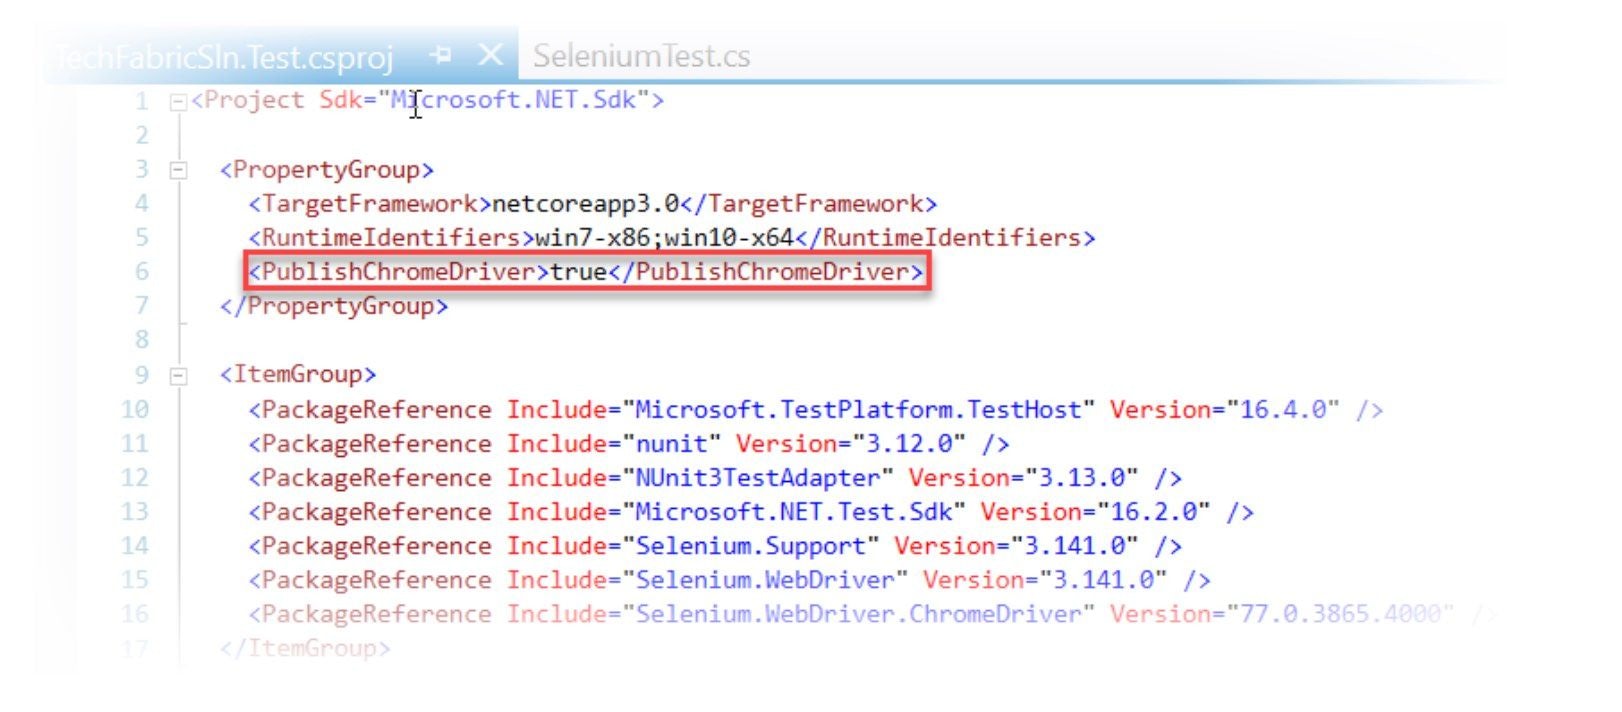
We need this option to get chromedriver into the artefacts after the project is published.
7. Run Selenium Test locally to check if it works.
In some cases on the road to hell automation you can face with obstacles in verifying the corrects versions of driver & packages, version for NuGet, Builder and/or .Net core.
That’s why we provide some hints in the form of code pieces which you can use in your Build procedure to avoid the obstacles you faced with:
trigger:
- master

pool:
  vmImage: 'windows-2019'

variables:
  buildConfiguration: 'Release'

steps:
- task: UseDotNet@2
  inputs:
    packageType: 'sdk'
    version: '3.0.x'
    includePreviewVersions: true

- task: NuGetToolInstaller@1
  inputs:
    versionSpec: '5.1.0'
    checkLatest: true

- task: NuGetCommand@2
  inputs:
    command: 'restore'
    restoreSolution: '**/*Test/*.csproj'
    feedsToUse: 'select'
    noCache: true

- task: DotNetCoreCLI@2
  inputs:
    command: test
    projects: '**/*Test/*.csproj'
    arguments: '--configuration $(buildConfiguration) --filter TestCategory=UnitTest'

- script: dotnet build --configuration $(buildConfiguration)
  displayName: 'dotnet build $(buildConfiguration)'

- task: DotNetCoreCLI@2
  displayName: 'dotnet build test'
  inputs:
    projects: '**/*Test/*.csproj'
    arguments: '--runtime win-x64'
    continueOnError: tru

- task: DotNetCoreCLI@2
  displayName: 'dotnet publish --configuration $(buildConfiguration) --
output $(Build.ArtifactStagingDirectory)'
  inputs:
    command: publish
    publishWebProjects: false
    projects: 'src/TechFabricSln/TechFabricSln.csproj'
    arguments: '--configuration $(BuildConfiguration) --
output $(Build.ArtifactStagingDirectory)/TechFabricSln/'
    zipAfterPublish: false

- task: DotNetCoreCLI@2
  displayName: 'dotnet publish test --configuration $(buildConfiguration) --
output $(Build.ArtifactStagingDirectory)'
  inputs:
    command: publish
    publishWebProjects: false
    projects: 'test/TechFabricSln.Test/TechFabricSln.Test.csproj'
    arguments: '-p:PublishChromeDriver=true --runtime win-x64 --
output $(Build.ArtifactStagingDirectory)/TechFabricSln.Test/'
    zipAfterPublish: false

- task: PublishBuildArtifacts@1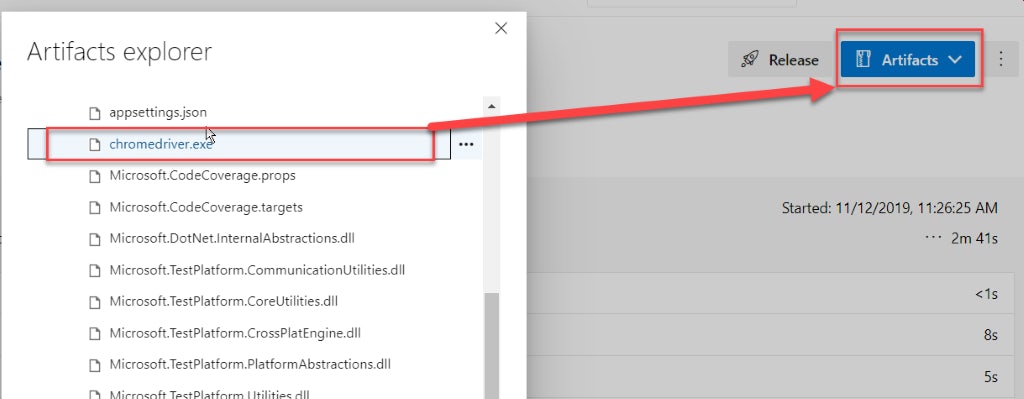
displayName: 'publish artifacts'As soon as the preparation is done, and the build is ended successfully, check the ‘chromedriver.exe’ located in artifacts of your build. It’s an important thing because without the driver, you won’t be able to complete written UI tests successfully.
Then make changes into your Release Pipeline or create a new one:
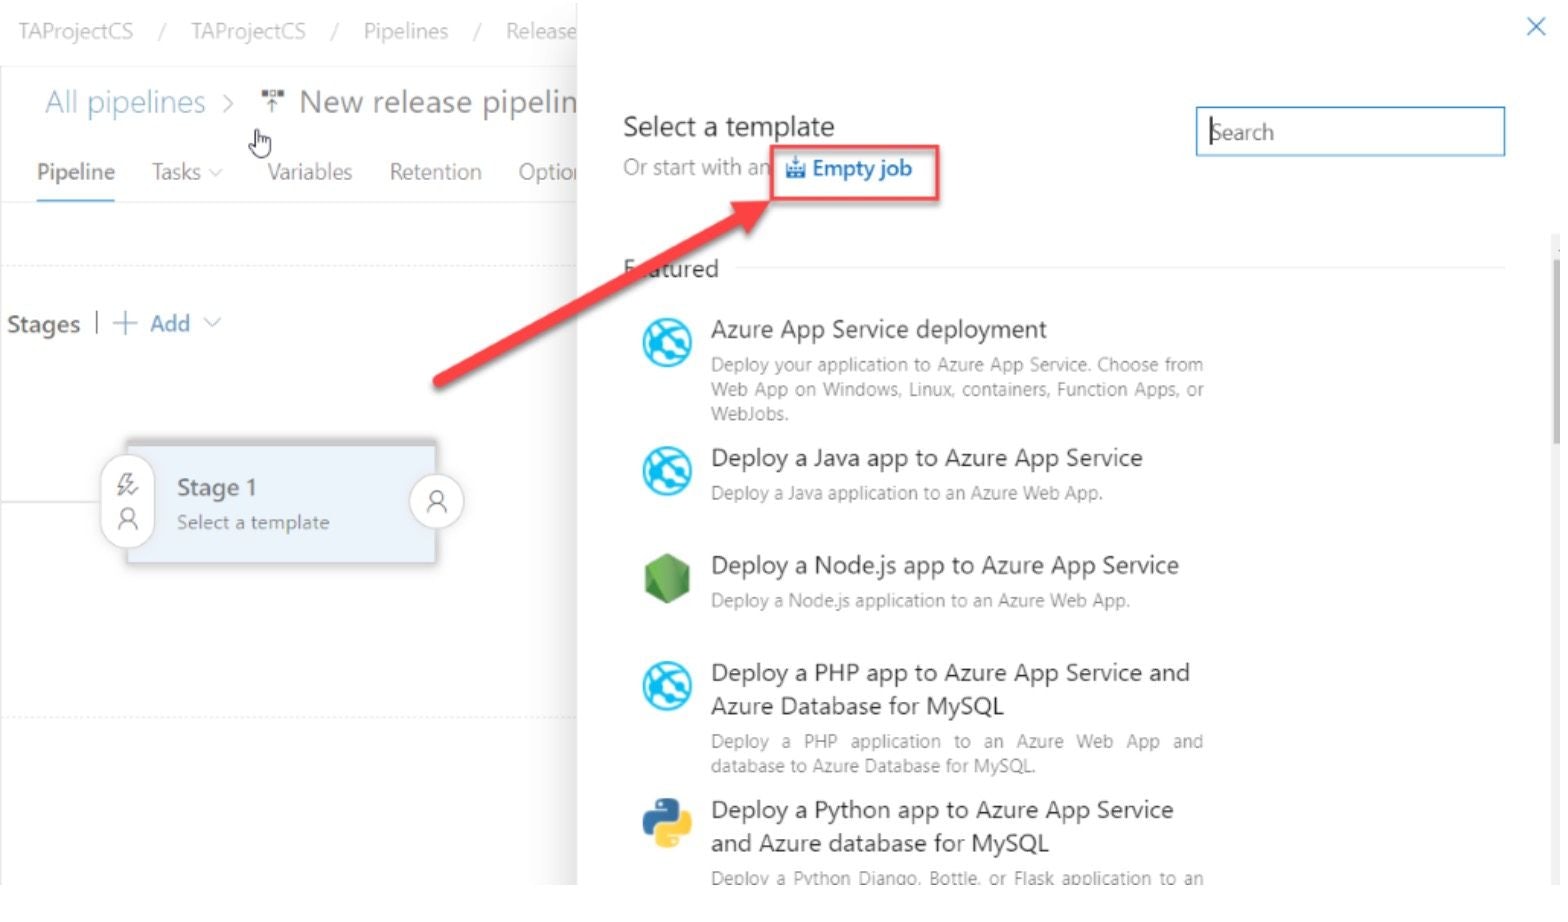
3. In opened Templates block click to start with ‘Empty job’
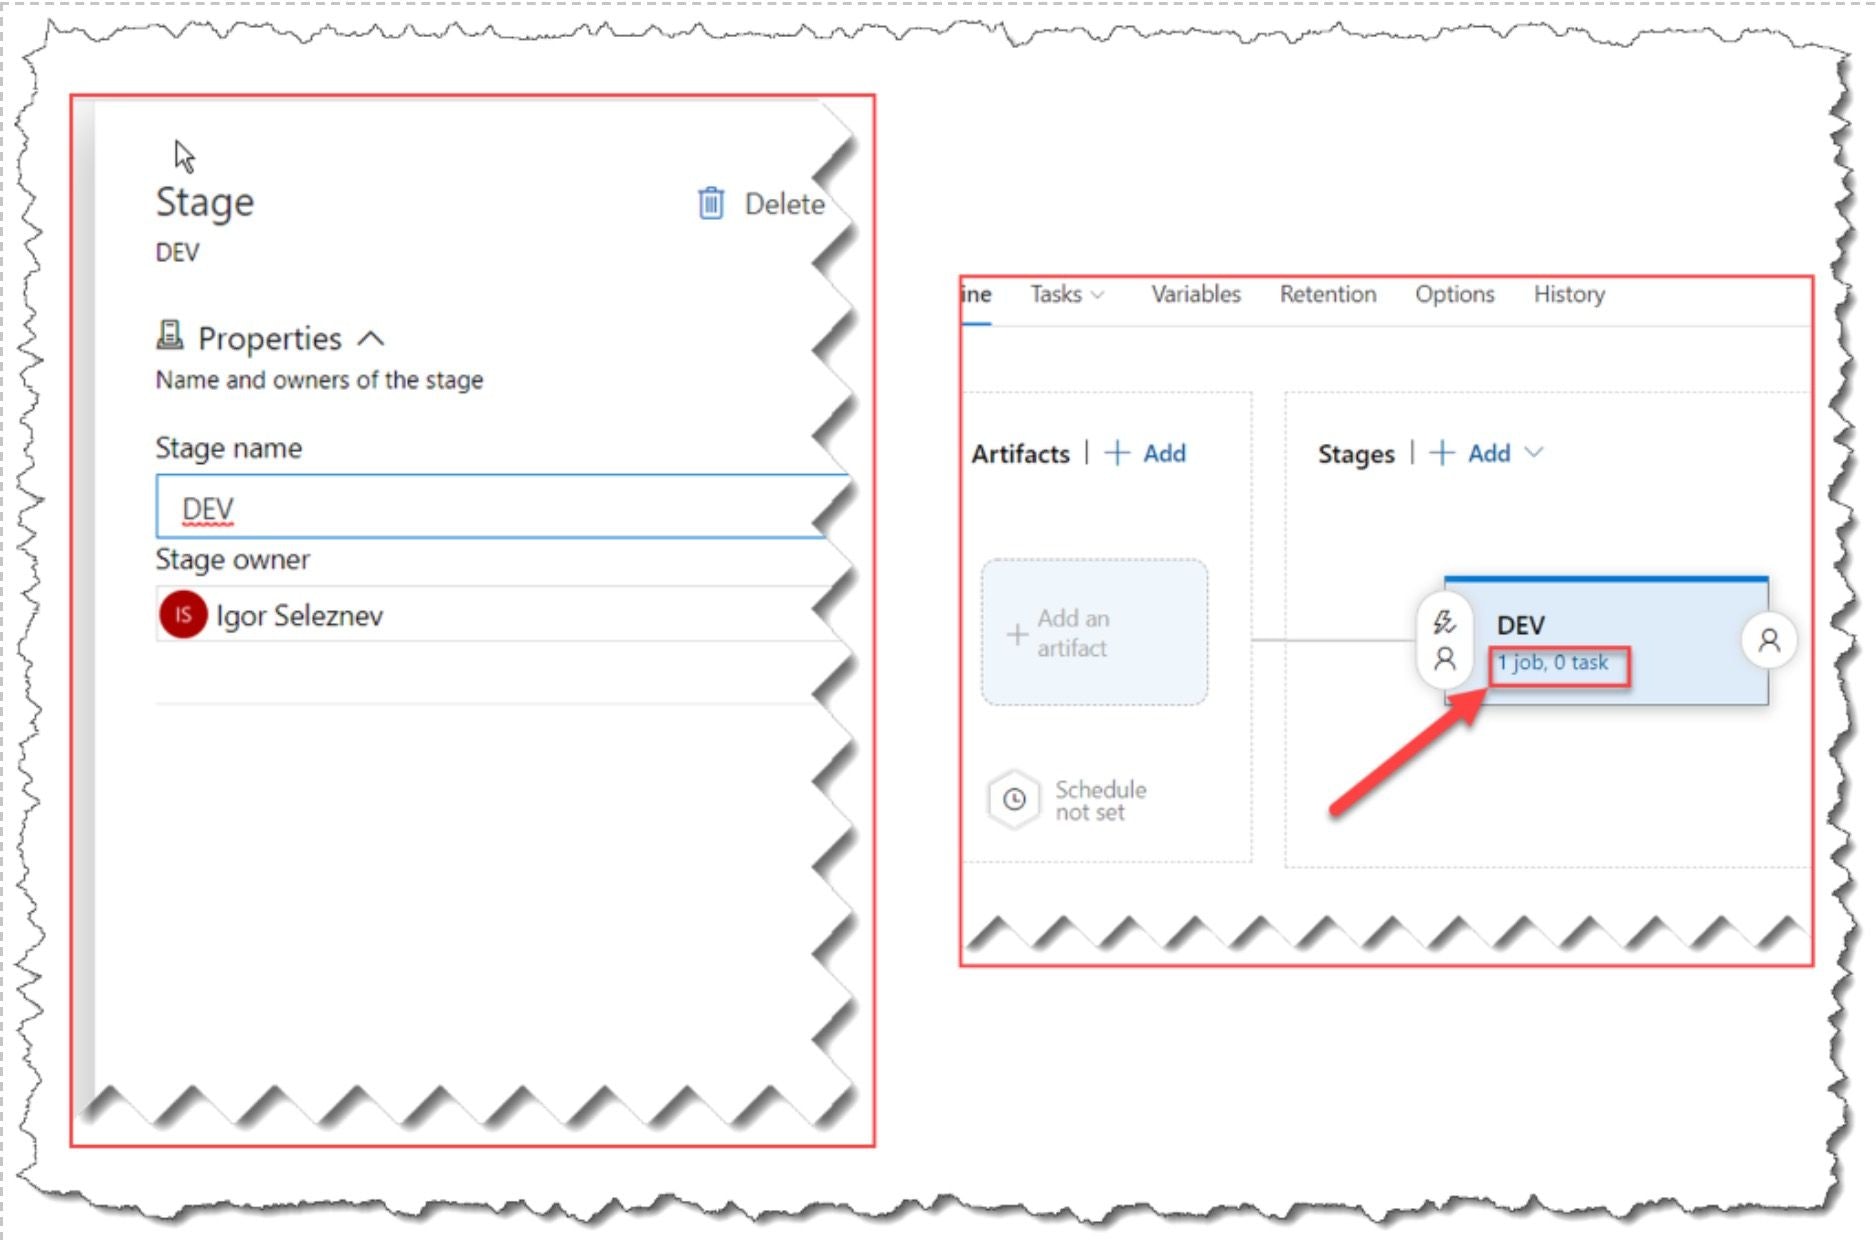
4. Name the stage and click on the Job/Task link
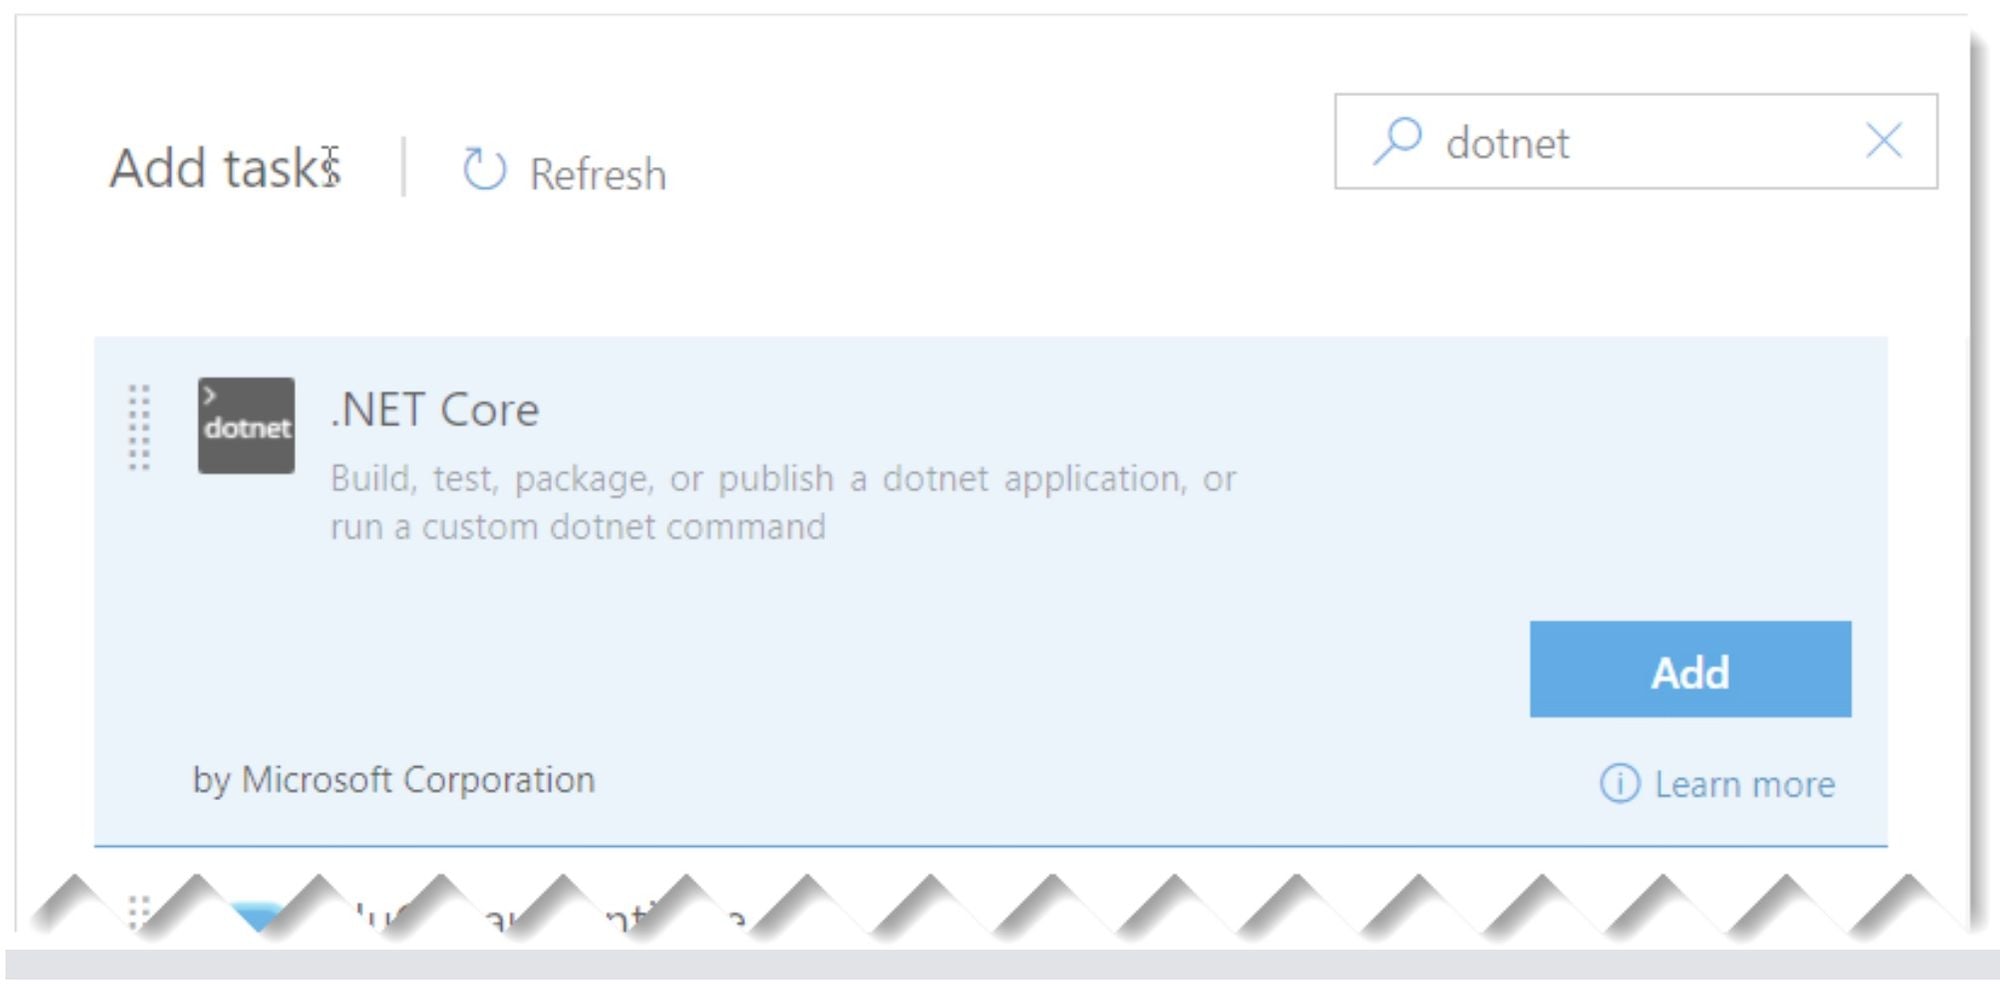
5. Add the Dotnet Core Task:
Complete the added task with the following parameters:
**/TechFabricSln.Test/TechFabricSln.Test/TechFabricSln.Test.dllAdd the arguments you want to use. To set logs you can use:
--logger:trx;logfilename=TEST.xml
To run only UI tests on this Release, add:
/TestCaseFilter:"TestCategory=UITests"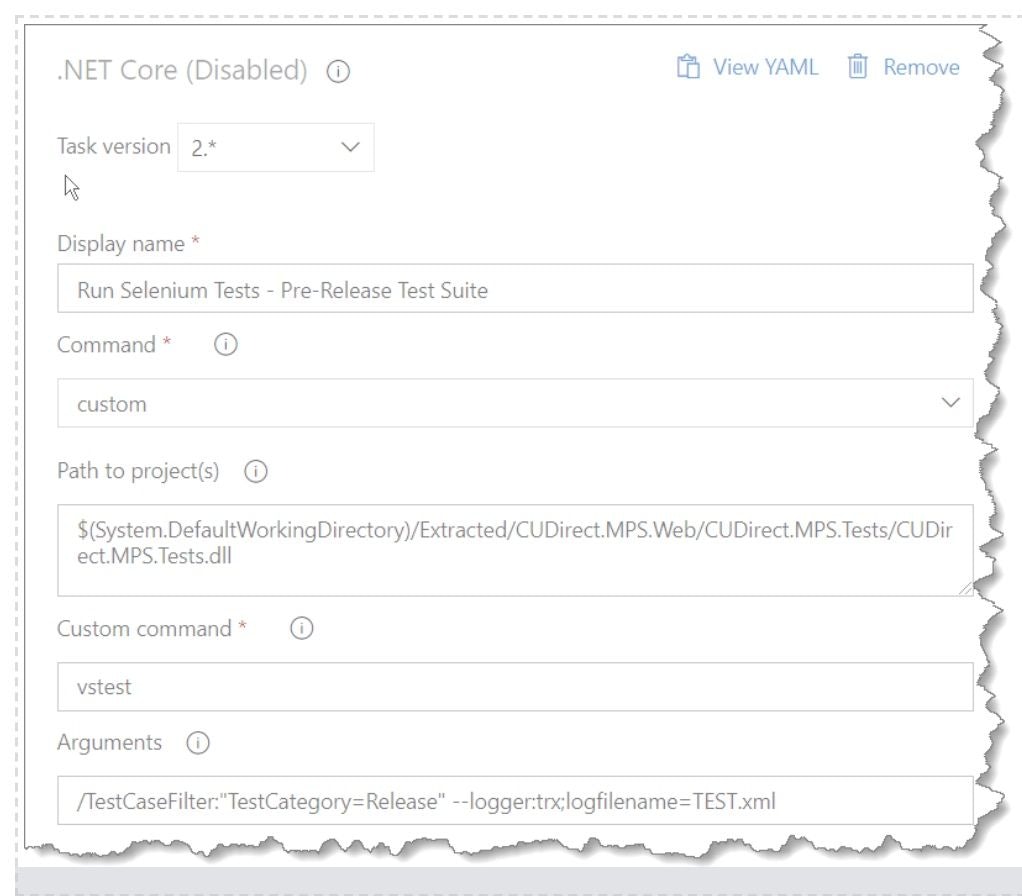
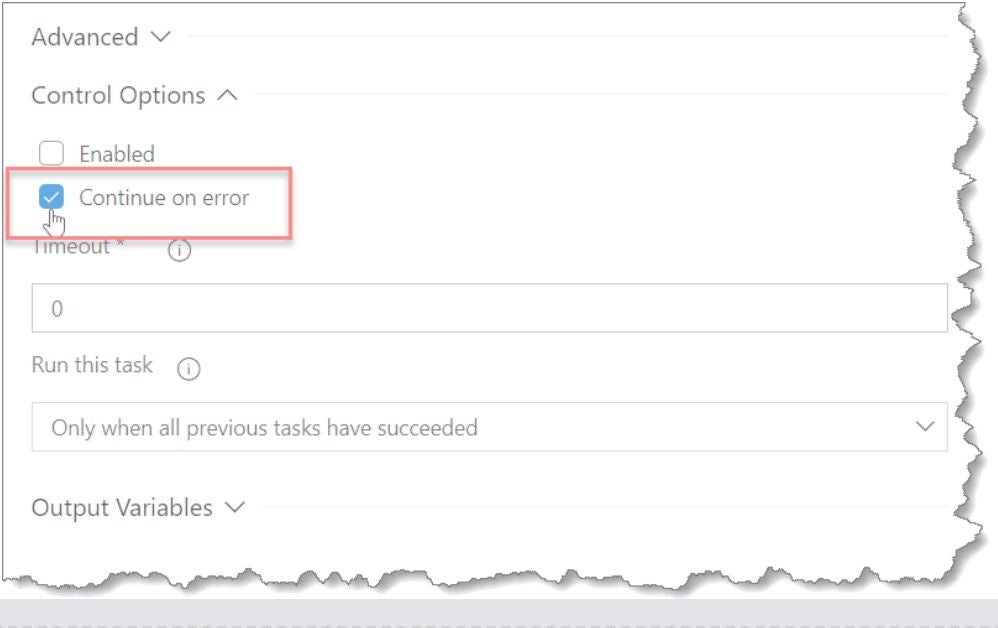
Also, it’s important to say, that in case one or more tests fail, the procedure will be stopped, to prevent this, we recommend to use ‘continue on error’ option.
6. Add the ‘Publish Test Results’ Task
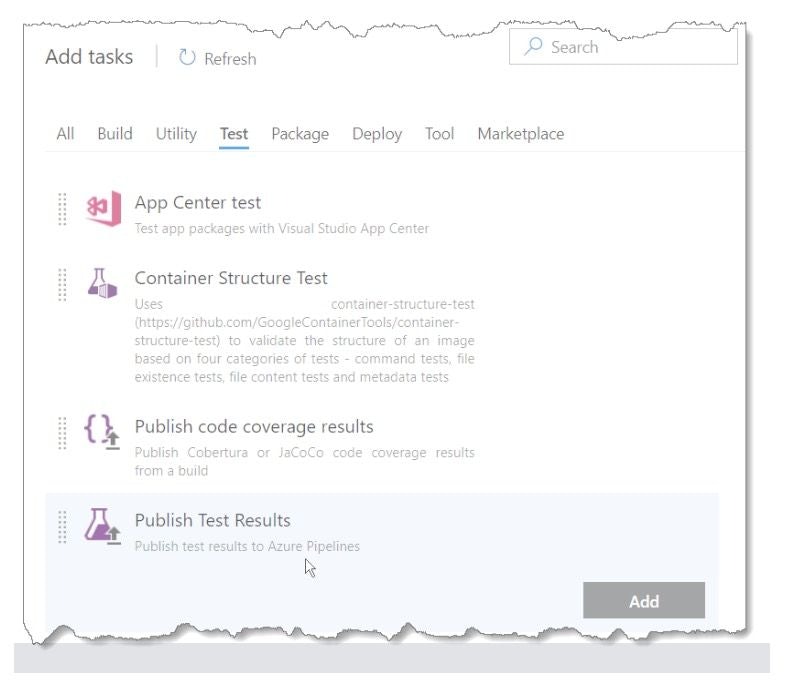
Complete the added task with the following parameters:

Now we are ready for our first release, save the Release Pipeline and start a new release. You can do this by queuing a new CI build, or by choosing Create release from the Release drop-down list in the release pipeline.
Check results you can do in 2 ways and they are the same as in the Build Pipeline:
The idea of this chapter is to show how to use Azure Test Plan to create linkages between manual and automated tests. Rather than using scheduled tests, running the tests on demand can be useful if you:
You already have almost everything we need, so in this chapter we proceed with:
Create linkage between Manual and Automated TCses
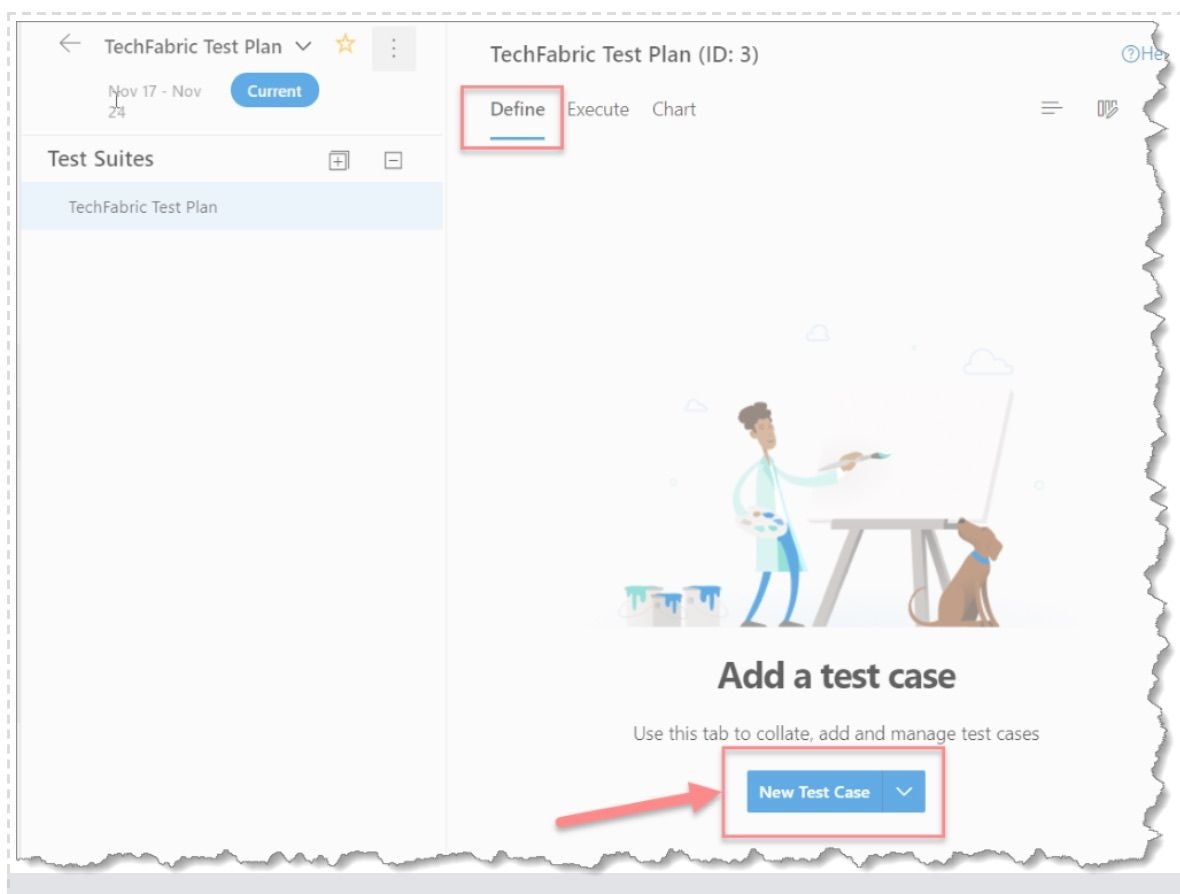
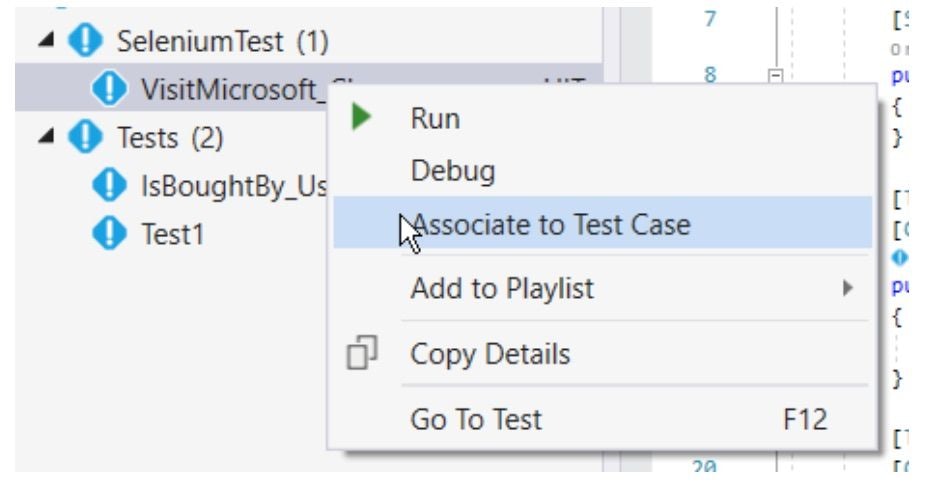
4. Write some TC Check, no matter which step is it.
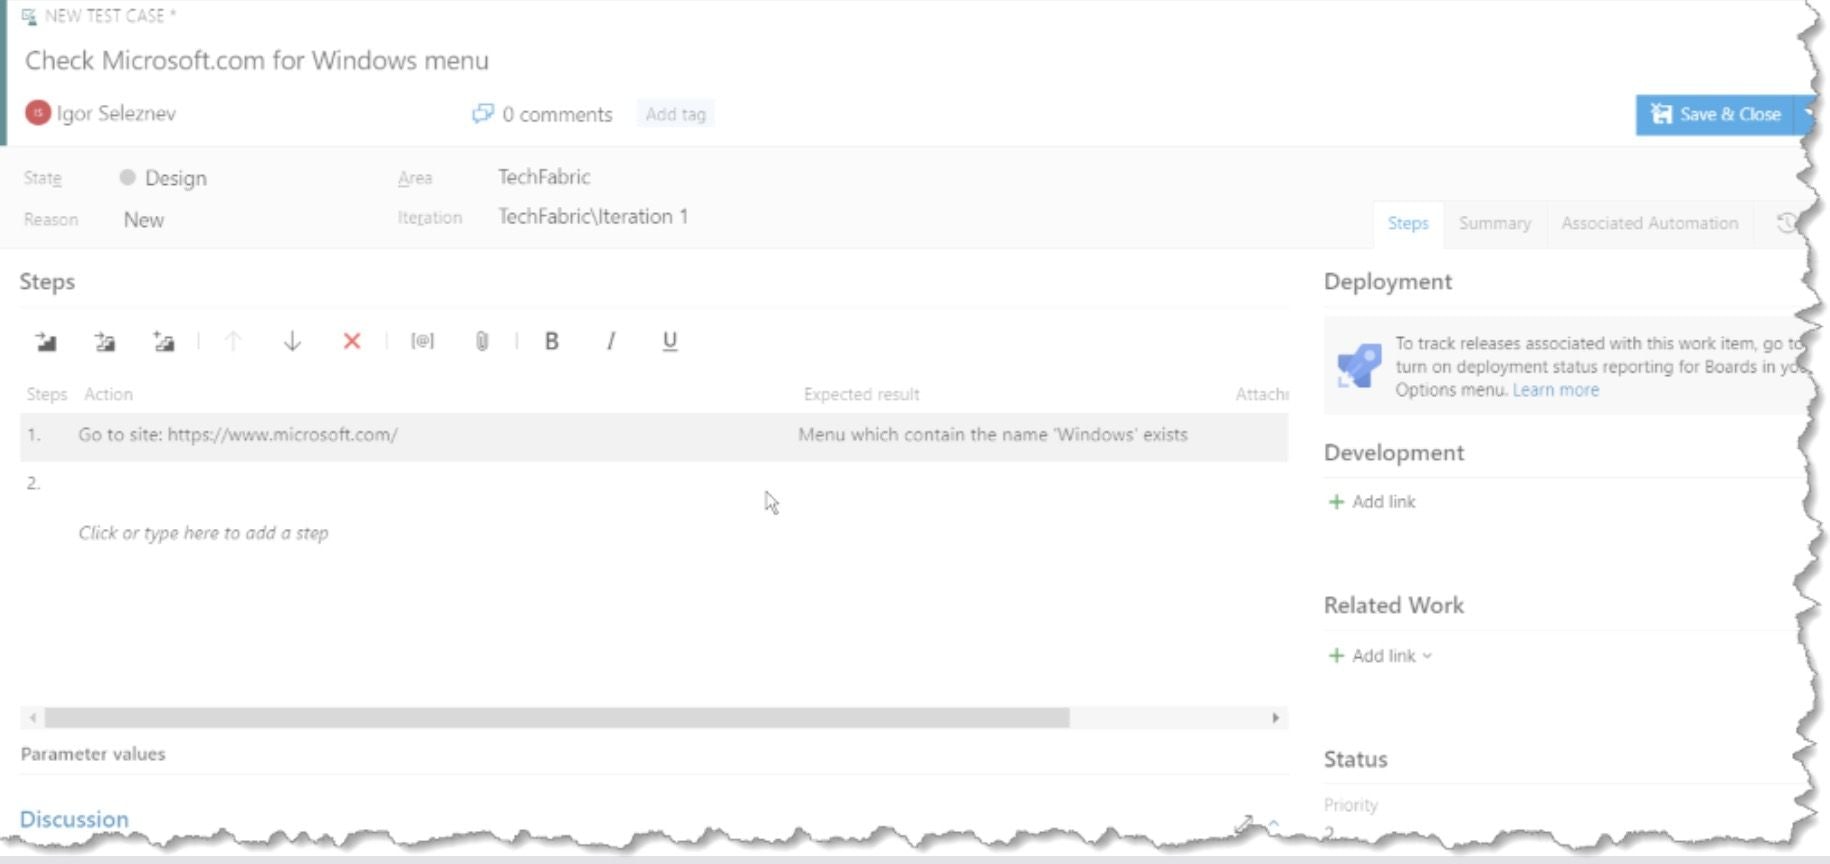
5. Open your Project in IDE;
6. Connect into the Team Services/Azure;

7. Add linkage with right click on the test -> Assosiate to Test Case, and add a TC by ID
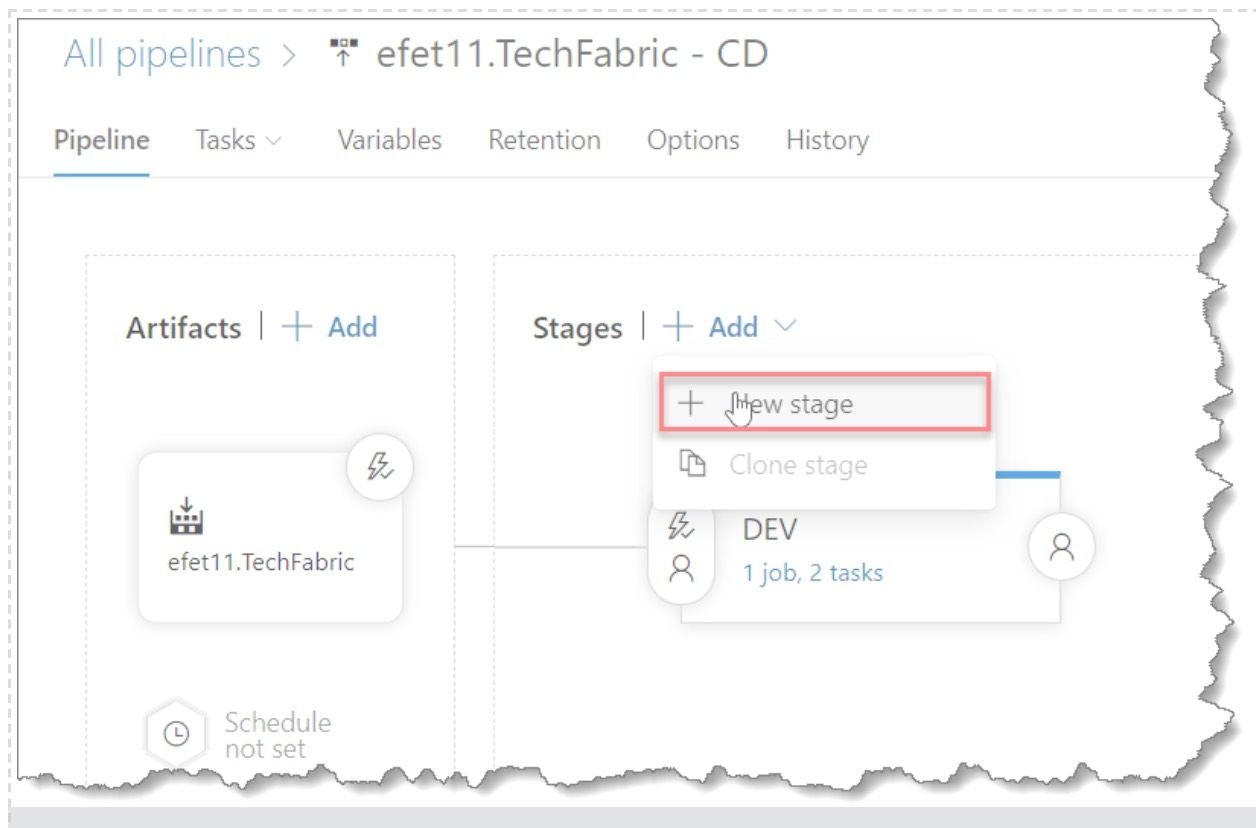
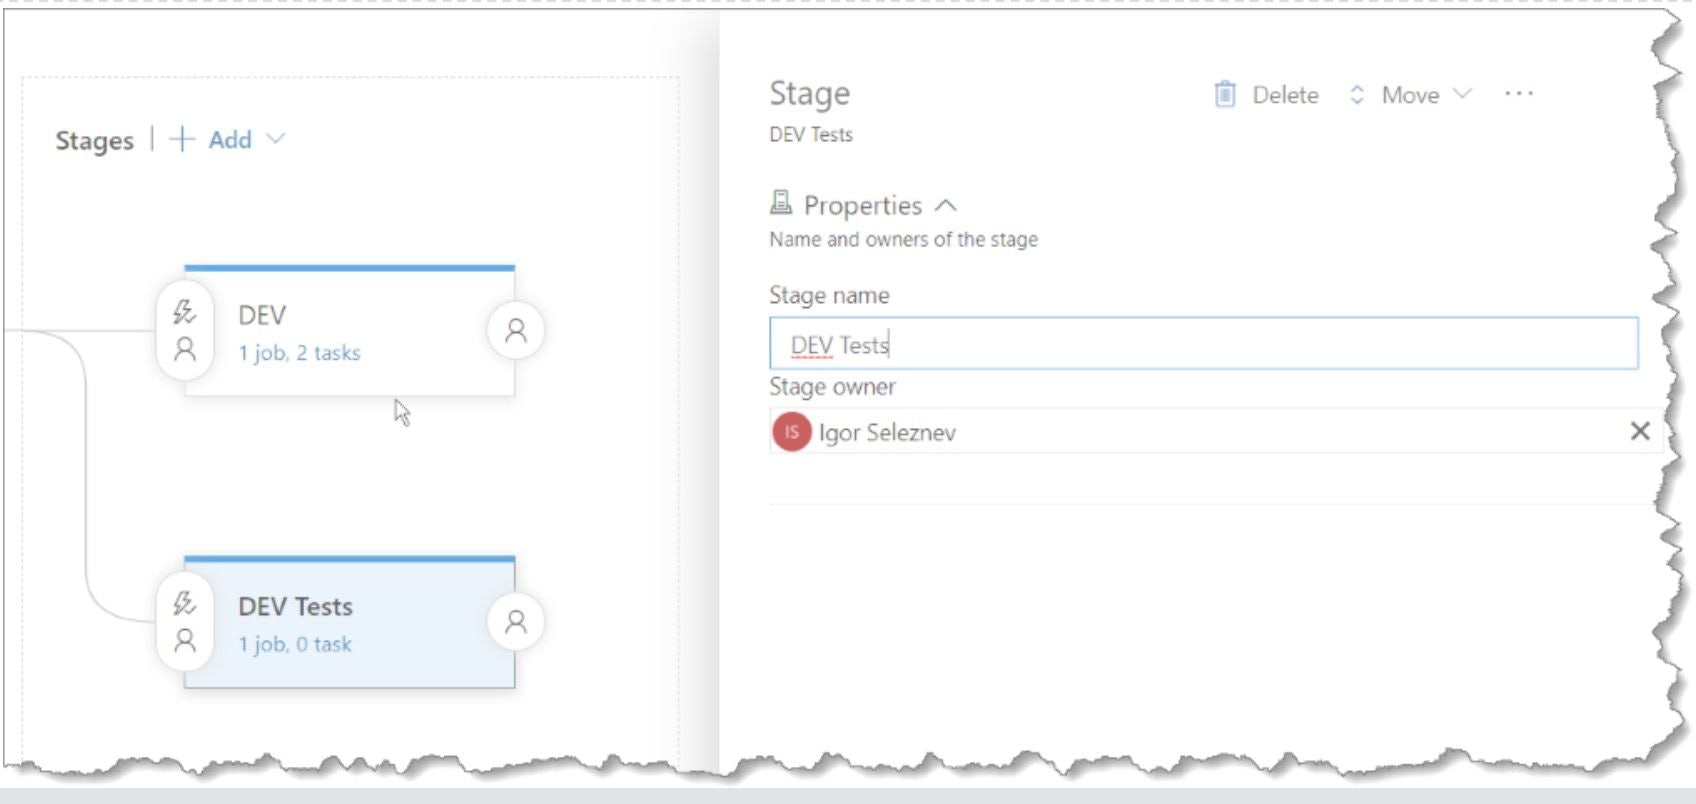
For management and moderation, it’s much easier to create a different stage with procedure, then add commands to the existed one. So, from this moment, we add additional stage named DEV Test, which we will use for running the tests on Demand, and not to increase the number of commands for our usual Web Project Pipeline as it’s usually not the easiest one.
To Add new Stage, go into All Pipelines and select the one you use for CD of the Project, and start with an Empty Template as we’ve done int the previous Chapter:
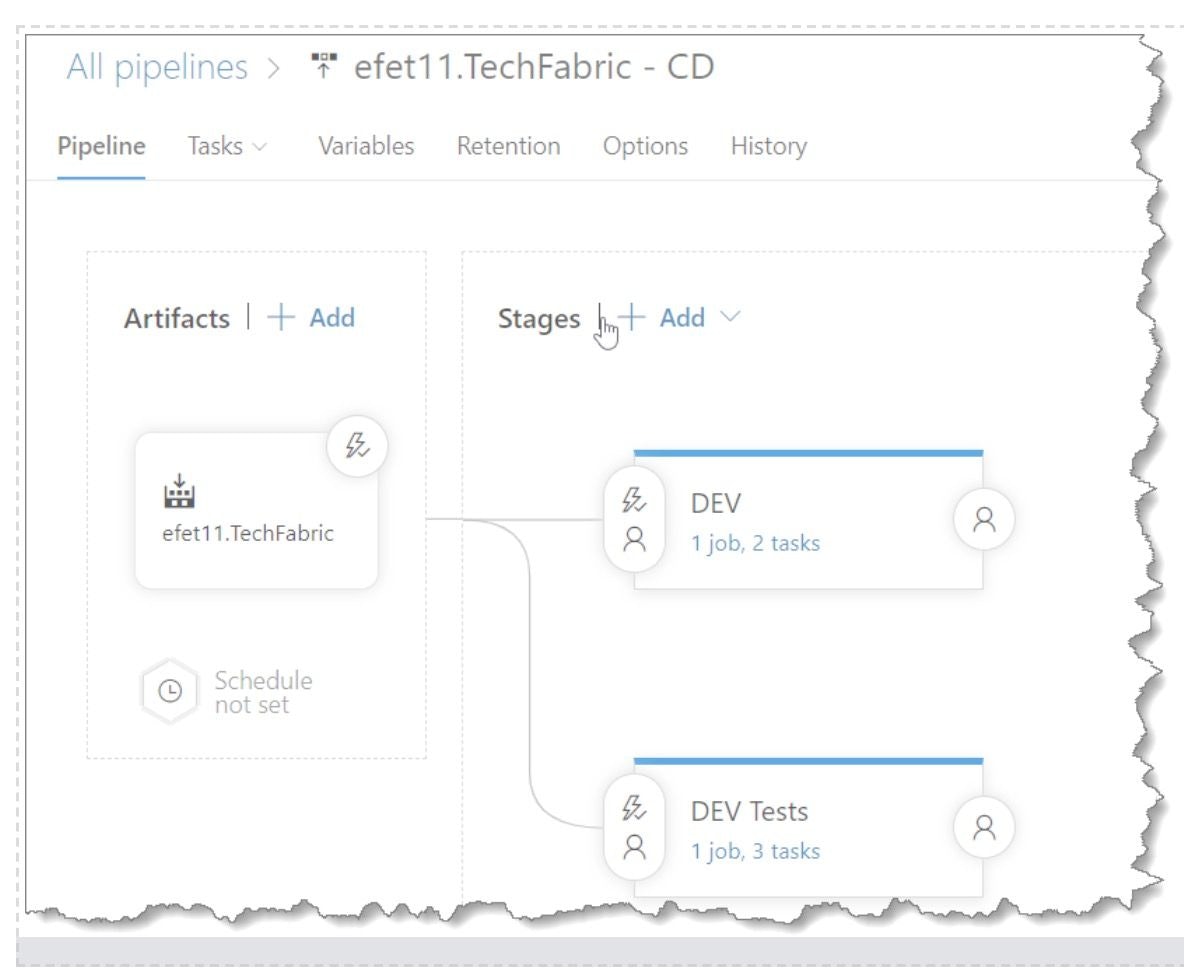
Now we need to define 3 tasks:

Add all 3 described tasks with the following settings:

2. VSTest Task settings:
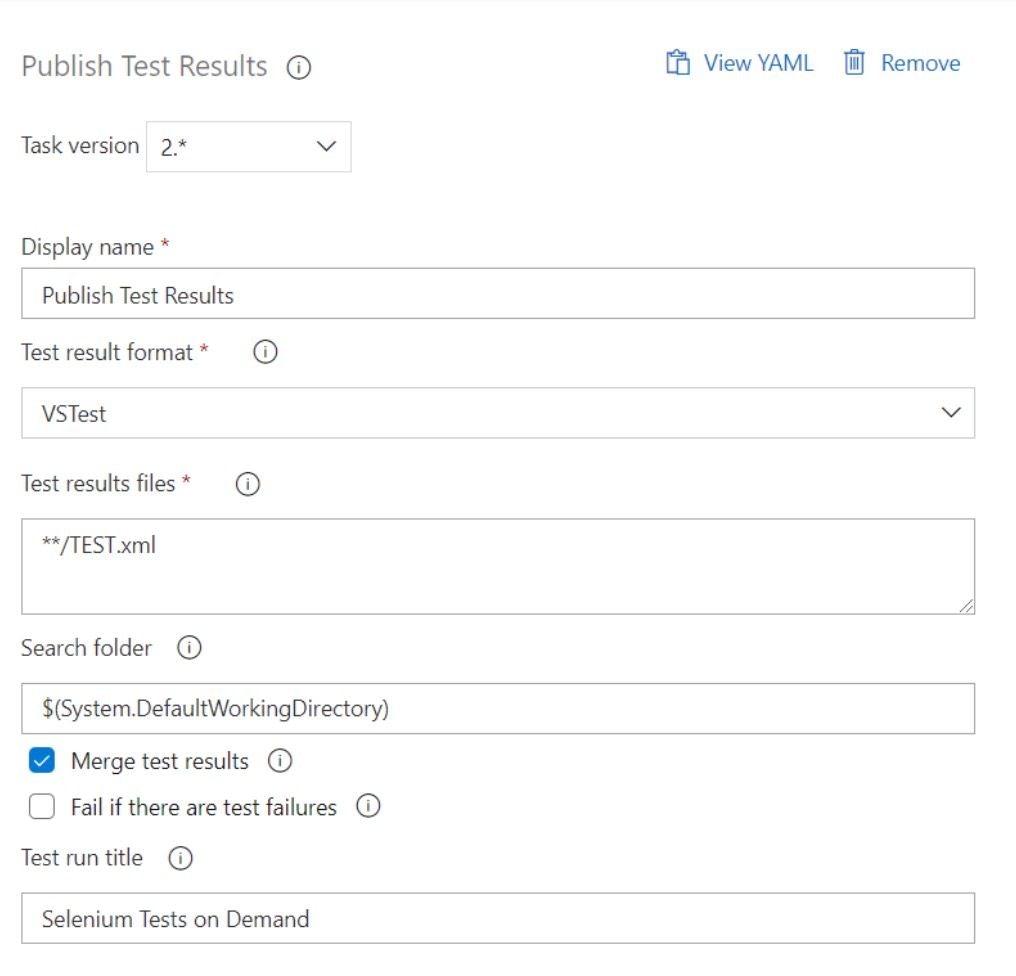
3. Use the analogue for settings of Publish Test Results command from your Release Pipeline, which has been described in Chapter III.
The common view in your CD after the all work is done, will look like this:
Now we can run the Tests from Test Plans chapter, so let’s try to do it:
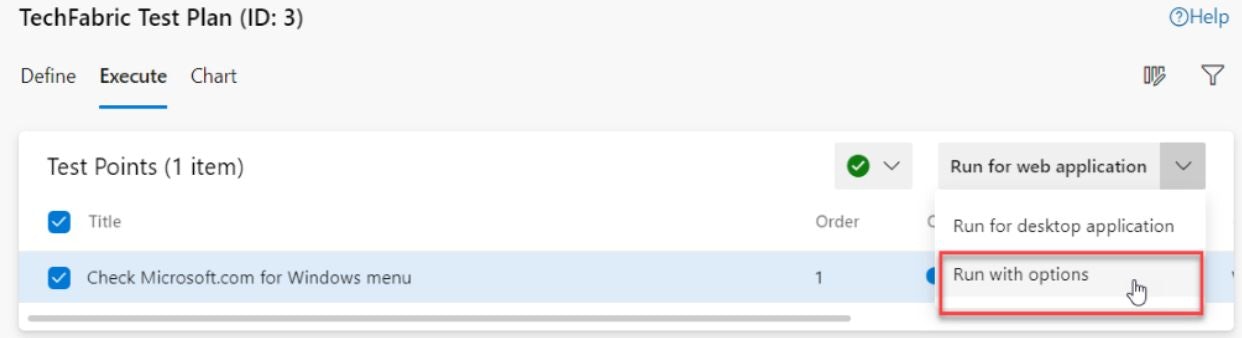
5. Choose the build and Stage where you want to run your UI Selenium tests. Use the latest build, and choose ‘Dev Tests’ Stage which we just created.
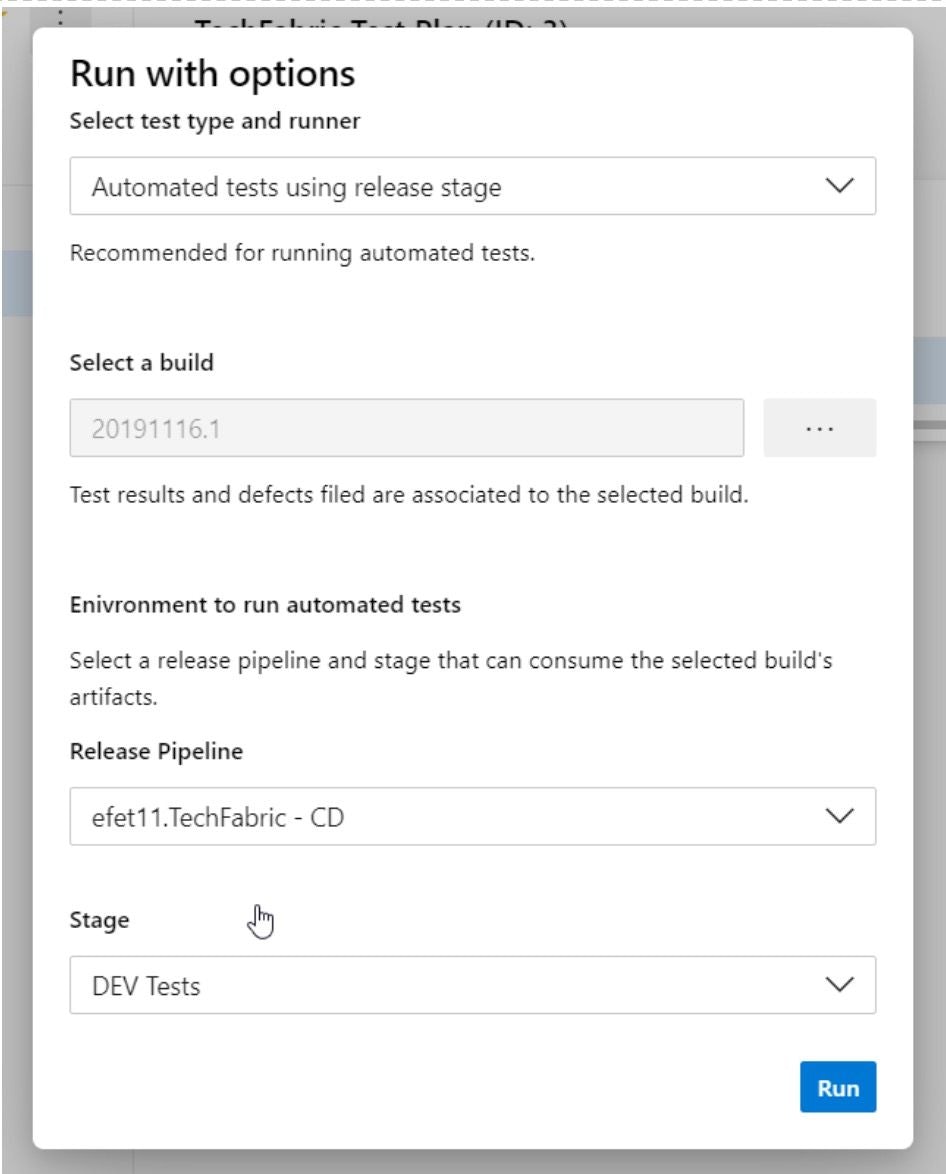
6. Push ‘Run’ button, and let's wait for result. The system will check if only automated tests are selected, validate the stage to ensure the VS Test task is present and has valid settings. After the validation it creates a test run, and then triggers the creation of a release to the selected stage. All these processes you can see as soon as you initialize the ‘Run’:
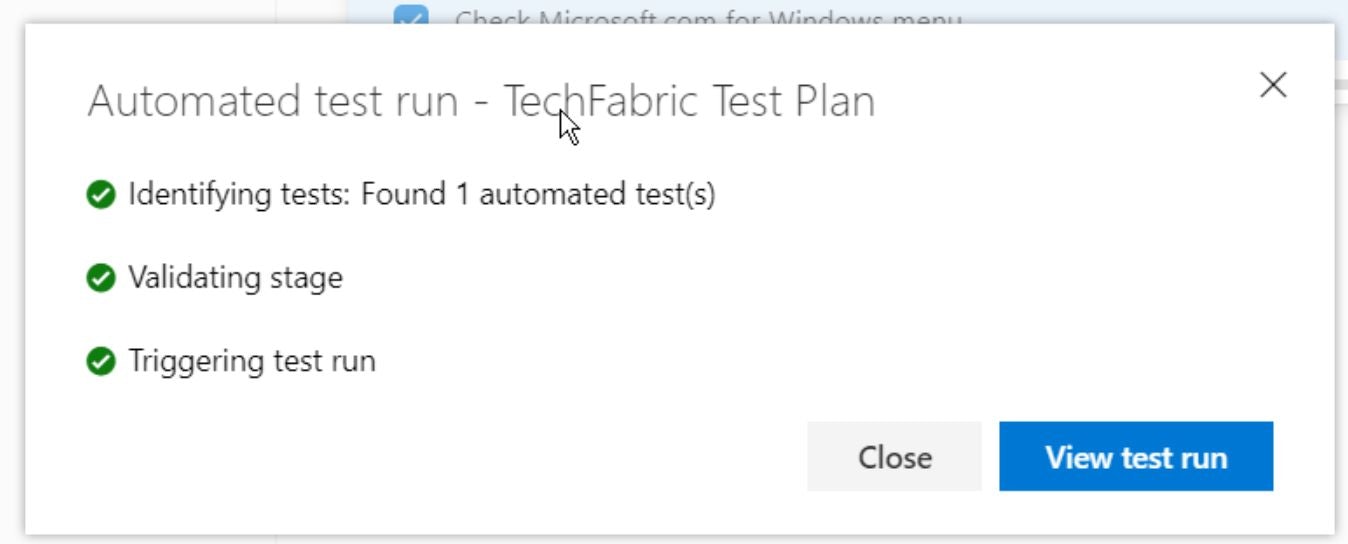
7. After the Test execution is complete, visit the Runs page and check for the test Results. The Test results page lists the results for each test in the test run, and if everything goes good you will find a prize from Azure saying that there are no test failures.


QA or Developer Teams usually cover Testing and Staged Servers with Autotests, to check for new features, complete regression testing, and to test builds and updates to ensure quality under a production-like environment.
The advantage is once the automated tests created, they can easily be provided in several of your Test Environments.
It’s a good practice for bigger projects so save the money and time for verifying software in this way before the users find something.
And returning to the start, using the automation properly, and covering your code with checks, you will incredibly decrease the number of heart attacks you can have because the customers found the bug in production.
Before we start, let’s imagine the situation where you are talking with your colleagues after a good weekend in your office kitchen and the manager runs into the room shouting ‘BUG, WE HAVE A BUG!”.
Configure Cypress tests with GitHub Actions for flexible environments, browsers, and resolutions. Seamlessly integrate into CI/CD pipelines for team-wide accessibility and efficient testing workflows
A good project needs a solid quality check, and teamwork among different experts, like developers and automation engineers, helps keep the product stable and reduces fixing costs after release.
Service Fabric is a Microservices platform by Microsoft, similar to Docker Swarm/Kubernetes. It provides great features out of the box and helps orchestrate and manage your microservices.
